There should be enough information here to tune any 986 or 996.
I have a early model of the 986 these cars came with M5.2.2 DMEs.
Early 996s had the same DME so it should work there too.
From what I know there is two software versions Damos27 and 28.
So I'll be covering the M5.2.2 here but if anyone gets files off the other Bosch DME.
I can definitely try decoding them too.
Things you will need:
-Computer (preferably a laptop)
-Galletto 1260 (They're like $20 USD on eBay)
-Over 13v power supply. (Preferably 13.8v)
-Software to work with the DME binary (TunerPro and/or WinOLS) (I will be using WinOLS because it's easier to find tables/maps)
-Soldering iron
Getting the binary off the DME:
The Galletto 1260 will come with a disk. Copy the software off the disk to computer.
Plug the 1260 into the computer and give it a minute while the drivers get installed in the background.
Plug the 1260 into your car with the ignition on (not started).
Start the 1260 software in admin mode, there's probably only one application within the files that came off the disk. Mine was called "NEW_SERIAL"
Set the parameters in the software according to your car.
In my case, Maker: Porsche, Driver: "996 - BOXSTER..."
Click the "ECU Data" button, once that's done loading. Click "Read ECU" and follow the prompt(s).
There we go you got the binary off your Porsche. Easy, right?
Opening the binary file in WinOLS:
I use WinOLS Demo to find the maps within the binary. (I'm not a dealer to get the full version of WinOLS anyway)
Then I use TunerPro to make edits to the map. TunerPro is less polluted with... stuff.
Start WinOLS and drag and drop the binary into WinOLS and follow the prompts.
You don't need checksums and you don't need to fill in anything in the prompts.
Now you should have a "HexDump" in front of you. It's a whole bunch of computer jaber.
In the top right of WinOLS, set the program to view the binary in Decimal and 8 bit format.
Please take some time understanding the program. It's definitely difficult.
With the "Hexdump" open pless Alt+Enter to open the Properties and get the Start address to 0 and set Columns to 16. Close the property window.
Scroll through the file till the address on the left is showing 01AE0 we're gonna start with the first fuel map.
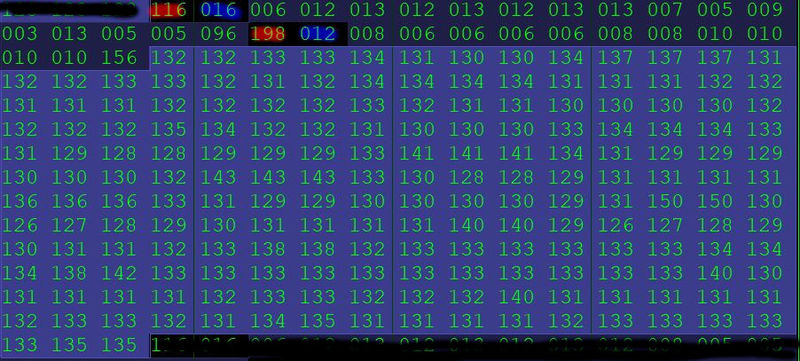
Okay, bear with me. Let me explain. 116 is a reference byte for RPM. 016 is explaining the axis size. The next 16 bytes are the steps of the axis.
(I'm not gonna explain how the steps work. Just look up DIY Motronic tuning and head to any BMW forum and you'll find a explanation)
198 is a reference byte for Load. 012 = axis size. After 12 bytes of "step bytes", starts the table. Lets have WinOLS help us make this into a table/map.
Click in the first byte of the actual table and press K, that should make a map and now you need to fill out the properties of that table.
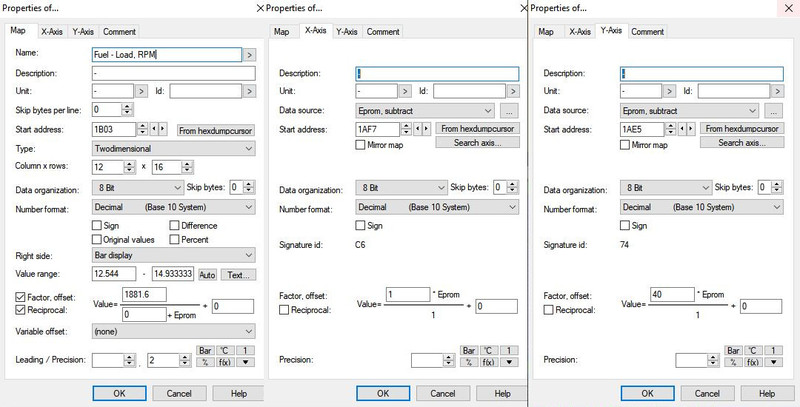
Either fill this out as you see it or figure out how it works so you can find more tables yourself.
The start address is the first hex address of the table or axis. Set you columns x rows accordingly.
You can swap the axes (Load x RPM) or (RPM x Load) that's by personal reference.
The start address of the axes will be the first of the steps for each axis.
It's important to set the "Data source" to "Eprom, subtract". WinOLS will do most of the calculations for you.
For the RPM axis set the Factor/Multiplier to 40 and leave the offset to 0.
Writing to the DME:
This is where a power supply over 13v is needed... and the soldering skills.
A 14v wall adapter would work too.
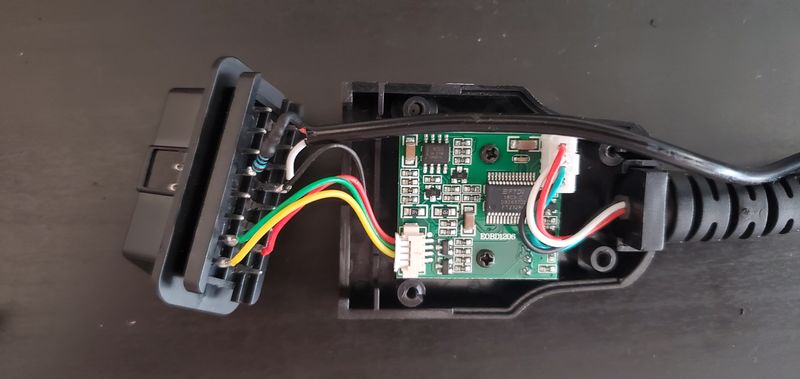
So Ground to the Instrument Ground (Black wire) and power wire to pin 12
(No resistor, that was a test)
Make a hole in the casing and glue in the wire.
Plug the power only when programming the DME.
The actual writing process goes almost like the reading process.
Click "ECU data"
Then "Open File", select your binary file
Plug in your wire.
Finally "Download File"
So far what I've found in the "code:"
Fan Control
Rev Limit
Fuel Tables
Part Throttle Ignition Timing
WOT Ignition Timing
Idle RPM based on Temp
Misc Information:
You can use a Galletto 4 but its bulky and requires a Windows 7 or older computer.
Galletto 1260 works with Windows 10.
Galletto 4 software also will let you wipe the DME without the programming pin powered.
The files you can get from your ecu might be different from mine. There was different "version", so far I've seen 4 variations.
Please ask your questions. I'll be here. This took a lot of time and I wanna pass on what I found out.


 Threaded Mode


