Go Back   986 Forum - The Community for Porsche Boxster & Cayman Owners > Porsche Boxster & Cayman Forums > DIY Project Guides

Post Reply
 
LinkBack Thread Tools Display Modes
Old 07-10-2017, 10:22 PM   #1
Registered User
 
Join Date: May 2015
Location: Greater Seattle, WA
Posts: 534
How to Remove Airbag Warning Decals from US-spec Vanity Mirror Covers

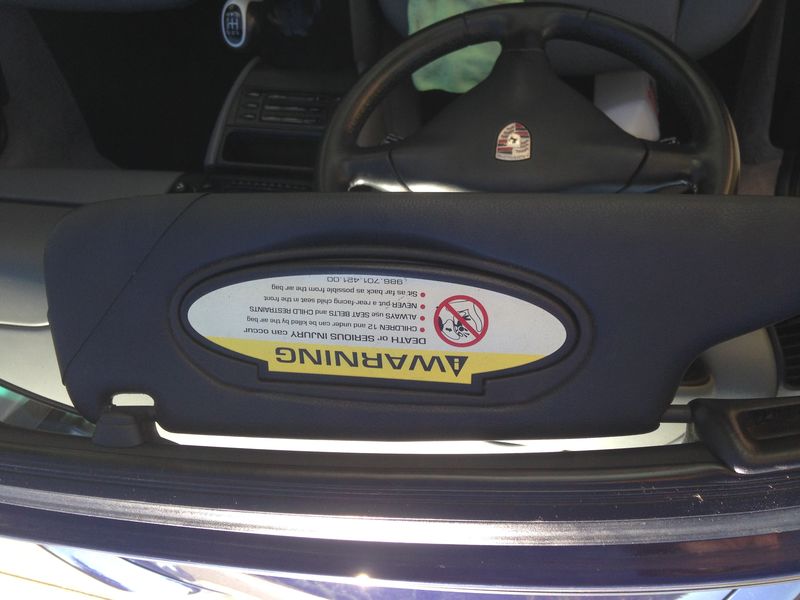
DIY: How to remove ugly US-spec airbag warning decals from vanity mirror covers:


[Note: there is related, but 10 year old thread seemed to cover a similar technique, and it has non-functioning pictures, but nonetheless, I'll link to it here: http://986forum.com/forums/boxster-general-discussions/12227-bye-bye-airbag-warning-decals-2.html]

Step 1: assemble the supplies:

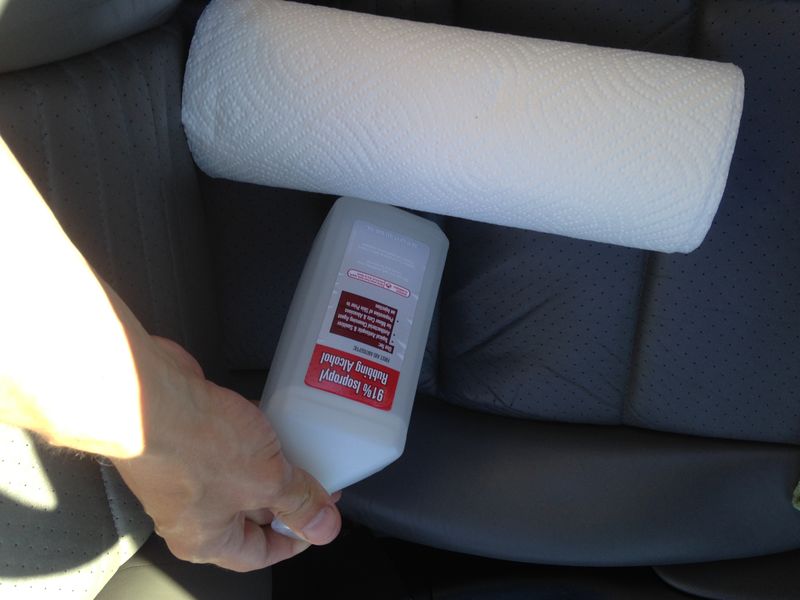
* "Hi-test" isopropyl / rubbing alcohol (I used 91%, but the more readily available 70% may work OK)
* paper towel
* short-nap microfiber cleaning cloth
* disposable nitrile gloves (not shown, but recommended)

Step 2: put the top down, and orient the sun visor down a bit for easy working access. Note: I recommend a flat surface, so the alcohol won't run excessively in any particular direction.

Step 3: fold the paper towel, soak the corner, and rub away the bulk of the decal with a first, initial pass. The decal will soften when exposed to the alcohol for a minute or so, and gentle agitation of the paper towel will easily rub it away - sort of balling up fragments into crumbs, and smearing it a bit.


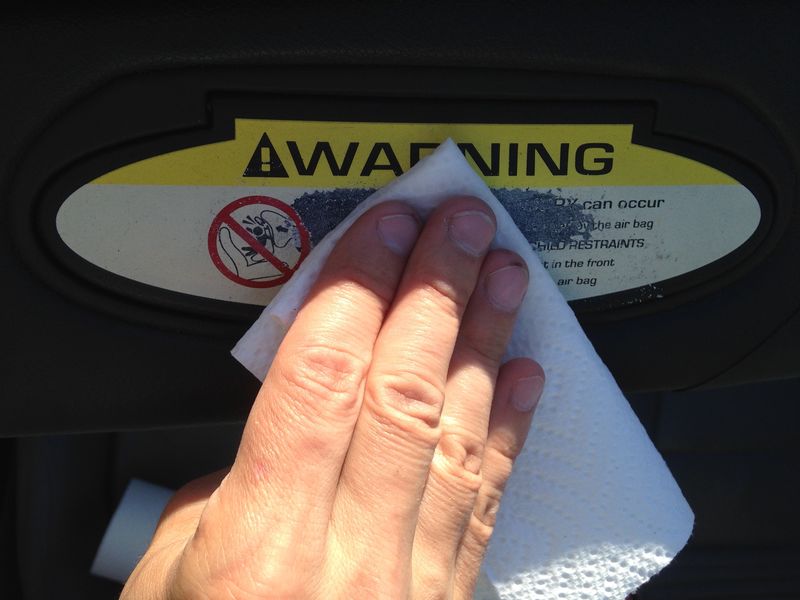
Fold over or tear off "spent" areas of paper towel, and start again on a new fresh section of the paper towel:


Take your time to not make a mess. Keep the alcohol and decal residue away from the crevices, and the hinge area! Keep going until the high spots of the textured plastic underneath are all bare to the colored decal, and no "crumbs" remain.

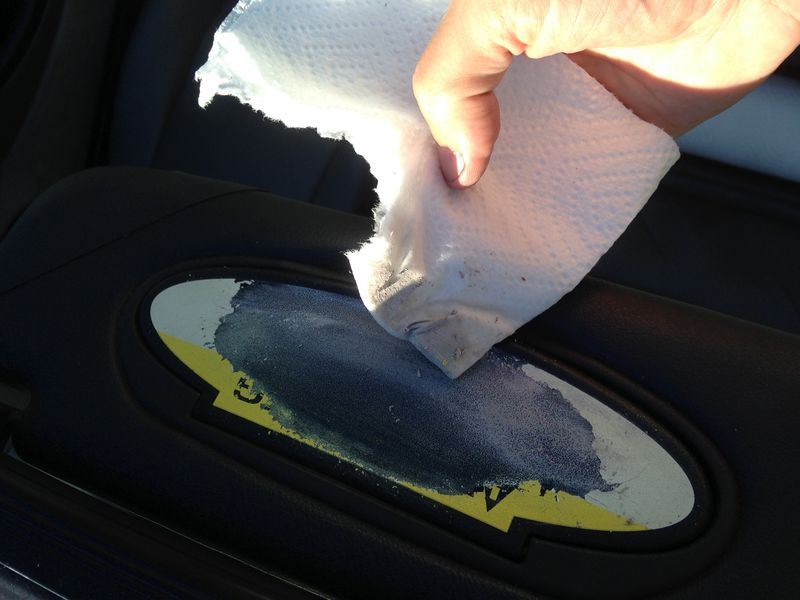
Step 3: when you're gotten off the bulk of the decal in a first pass, switch to a disposable, short-nap microfiber. Like the paper towel, wet with alcohol, and rub in small back and forth or circular motions:


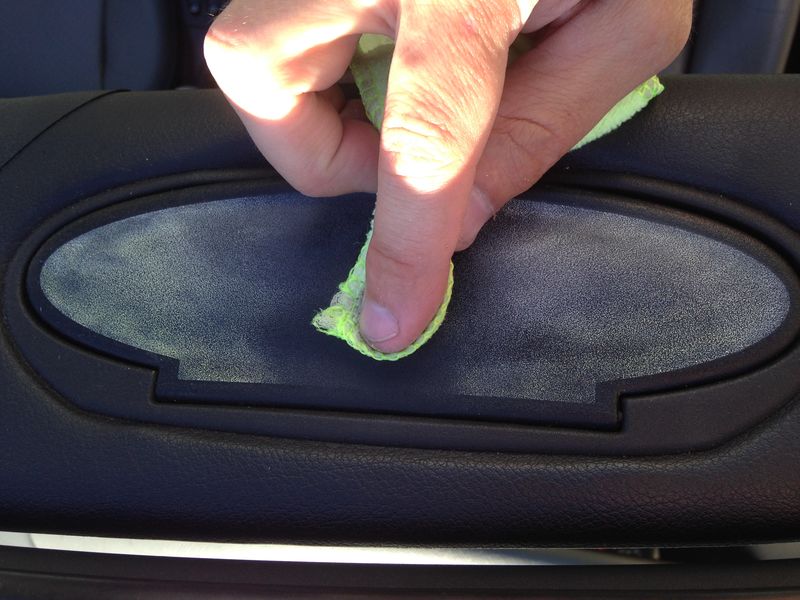
The idea is to flip-flop the short bristle tips of the microfiber back and forth, so they work down into the get the valleys of the textured plastic, to get out the remaining decal.

The result, after about 10 minutes, looks really good under ordinary lighting from about 1-2+ feet away:


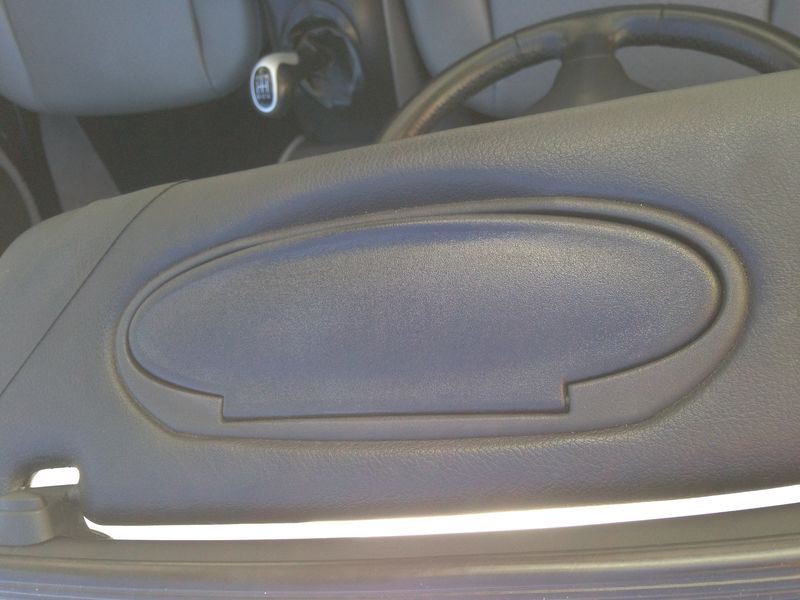
(If you used a high-powered light and microscope or high-powered magnifying glass, you could probably find some residue in some of the deeper pits of the texture, but this is probably adequate for most applications.

Alternatives:
1. I've read some people use a black dye afterwards, or perhaps even over the top of the factory graphic. This may shorten the time required rubbing.

2. Other people buy matte black, cover-up decals from eBay, and stick them on over the factory decal. I'd imagine this "cover-up" would be quicker, but might be more noticeable up closer. An eBay listing example for a set of these "cover-up decals":
Porsche Sun visor Cover-up decals 911 Boxster Cayman Carrera S 997 987 986 996 | eBay
Note: The seller advertises the decal is thin enough to assume the grain of the plastic, but it's hard to imagine vinyl decal not changing the texture somewhat. The only picture from the above-linked eBay auction doesn't provide more than about a 5-10 foot quality level of detail:


3. Other people have reported purchasing ROW (non-us spec) vanity mirror assemblies and swapping those for the us-spec assemblies, as the ROW spec don't have the warning labels.

Cheers!

__________________
2001 Boxster

Last edited by jakeru; 07-10-2017 at 10:31 PM.
jakeru is offline   Reply With Quote
Old 07-11-2017, 10:51 AM   #2
Registered User
 
Filastein's Avatar
 
Join Date: Apr 2017
Location: Upstate, SC
Posts: 66
My wife used her clothes steamer and they came off in about 5 pieces each, in about 5 minutes each. Applied Solution Finish afterwards. Tried the cover-up decals but they quickly bubbled.
__________________
2 0 0 1 S
Filastein is offline   Reply With Quote
Old 07-11-2017, 02:53 PM   #3
Registered User
 
Porsche9's Avatar
 
Join Date: Sep 2013
Location: Chandler, AZ
Posts: 1,796
I removed mine as you described but was never happy with the result. Good but up close there was a residue that I could see. I tried the sticker route and the one I got from an ebay seller (sorry it's been years and I no longer know who the seller was) fit nicely from edge to edge and was easy to apply. The results were better then just removing and I never had a problem with bubbling and the texture is a really close match.

I just wish the lawyers would not make the auto manufacturers put on these ugly stickers. On some cars they are virtually impossible to remove. With the Boxster's top down it is a real eye sore
__________________
03 Carrera
02 Boxster S Guards Red, black interior with matching hardtop
89 Carrera 4
89 944 S2
78 911SC
Porsche9 is offline   Reply With Quote
Old 07-11-2017, 04:11 PM   #4
"50 Years of 550 Spyder"
 
10/10ths's Avatar
 
Join Date: Jun 2015
Location: The Road
Posts: 918
I did this:

Sunvisor Cover Ups stickers that fit Porsche models 911 997 987 996 Boxster S | eBay


Works great. Two years later, still looks great.
__________________
550 SE #310---"It's more fun to drive a slow car fast, than a fast car slow."
10/10ths is offline   Reply With Quote
Old 07-12-2017, 07:02 PM   #5
Registered User
 
Join Date: May 2015
Location: Greater Seattle, WA
Posts: 534
Quote:
Originally Posted by Filastein View Post
My wife used her clothes steamer and they came off in about 5 pieces each, in about 5 minutes each. Applied Solution Finish afterwards. Tried the cover-up decals but they quickly bubbled.
It would be interesting to see pics of how the decal comes off with steam.

Quote:
Originally Posted by Porsche9 View Post
I removed mine as you described but was never happy with the result. Good but up close there was a residue that I could see.
You may have not rubbed long enough, or used a compliant enough cloth (and/or enough pressure with a paper towel) to get down into the crevices for the texture. Or maybe, you just have OCD and the little specs of pigment, no matter how little, that you just know are in the pits of the texture, just drive you crazy (only visible on mine from a few inches away, by the way, and under very bright lighting).

Quote:
Originally Posted by Porsche9 View Post
I tried the sticker route and the one I got from an ebay seller (sorry it's been years and I no longer know who the seller was) fit nicely from edge to edge and was easy to apply. The results were better then just removing and I never had a problem with bubbling and the texture is a really close match.
Quote:
Originally Posted by 10/10ths View Post
Cool, guys! We need pics, however which show the true, as-installed, full-gory details of those decals (the color match, the texture and the stickers' seams/edges...) or they DIDN'T HAPPEN!
__________________
2001 Boxster
jakeru is offline   Reply With Quote
Old 12-02-2017, 04:59 PM   #6
Registered User
 
Join Date: Sep 2017
Location: Georgia
Posts: 14
I am a new member here on the forum and I had heard about using the rubbing alcohol to remove the decals. I did use the alcohol with some microfiber rags (paper towels tore up to quickly) and had to use a lot of effort to remove most of the decal/adhesive. After I was finished I used a black magic marker to cover the entire area where the decals were located. It looks surprisingly good and even up close it is hard to detect. Anyone not knowing about the removal would never know there was ever anything there.
Stephan is offline   Reply With Quote
Old 12-15-2017, 06:03 AM   #7
Registered User
 
Join Date: Sep 2017
Posts: 69
I removed mine with some brake clean on a rag but it still left some very slight residue trace in the texture. I colored it over using a black sharpee marker and while the ink was still wet wiped it down with a dry paper towel. I still can't say it's perfect but it sure looks better than what I started with.
Twin headlight Ernie is offline   Reply With Quote
Old 03-27-2019, 04:49 PM   #8
Registered User
 
Join Date: Jan 2018
Location: Guyton Georgia
Posts: 8
Removed Decals

I removed the decals from the visor vanity mirror cover with my steamer. They came right off. I then came back with a little isopropyl alcohol to get the remaining residual glue. The steamer really did the trick. It looks so much better without that ridiculous safety warning decal. Good luck.
__________________
2001 986 Boxster S
Tjkarp is offline   Reply With Quote
Old 03-27-2019, 05:35 PM   #9
Registered User
 
Join Date: Oct 2018
Location: Cali
Posts: 45
Steamer

Quote:
Originally Posted by Tjkarp View Post
I removed the decals from the visor vanity mirror cover with my steamer. They came right off. I then came back with a little isopropyl alcohol to get the remaining residual glue. The steamer really did the trick. It looks so much better without that ridiculous safety warning decal. Good luck.
What is this steamer you are referring to?

SlowernOlder is offline   Reply With Quote
Post Reply


Thread Tools
Display Modes

Posting Rules
You may not post new threads
You may not post replies
You may not post attachments
You may not edit your posts

BB code is On
Smilies are On
[IMG] code is On
HTML code is On
Trackbacks are On
Pingbacks are On
Refbacks are On


All times are GMT -8. The time now is 01:04 AM.


Powered by vBulletin® Version 3.8.7
Copyright ©2000 - 2024, vBulletin Solutions, Inc.
Content Relevant URLs by vBSEO 3.6.0
Copyright 2024 Pelican Parts, LLC - Posts may be archived for display on the Pelican Parts Website -    DMCA Registered Agent Contact Page