 01-03-2015, 07:38 PM
|
#1
|
|
Beginner
Join Date: Mar 2013
Location: Houston
Posts: 1,659
|
Repairing a broken roll bar windscreen tab
Like all roll bar windscreens mine are old enough to have lost most of their plastisizers. That means the release tabs become brittle and snap off if you're lunatic enough to try removing one to clean it. Don't panic, there is an easy and permanent repair. You will need a pop rivet gun, a small diameter pop rivet, a Dremel tool with a metal cutting disc a hacksaw blade and a drill/drill bit that matches the hole size needed for the pop rivet.
First take the broken windscreen and tab and measure out a length of hacksaw blade against it that will be the new spring to hold the tab in place. The length should be long enough to leave 1.5 times the pop rivet diameter back from the break in the plastic tab on each side. This is so the hole you will drill in the plastic windscreen and plastic tab will have adequate edge distance from the break in the plastic for structural integrity. I needed about 5/8 an inch of hacksaw blade to act as a "spring" to maintain this edge distance in the plastic.
Mark the length of hacksaw blade you think you need, and drill a hole appropriate for the pop rivet diameter and plastic edge distance into each end of the length of hacksaw blade.
After drilling, use the dremel tool to cut the hacksaw blade to length.
While holding the hacksaw blade in the proper place on the plastic windscreen, start match drilling a hole to mark its position. Remove the length of hacksaw blade and finish drilling. Check the length of the "spring" making sure its holes line up to about 1.5 rivet diameter on both side of the break in the windscreen/tab. If it's too short, make a longer spring
If it's good to go, place your spring on the inside diameter of the windscreen and pop rivet it in with the rivet gun. The rivet should run from the outside of the windscreen with the long end of the rivet protruding toward the center of the windscreen. Then drill and rivet the broken tab into place the same way.
That's it, you're done. - worked for me anyway! 
__________________
2003 S manual
|

|

|
|
01-08-2015, 07:21 AM
|
#2
|
|
Registered User
Join Date: Sep 2013
Location: California
Posts: 466
|
Better yet, purchase nine8six kickass windscreen and gain an illuminum frame with aluminum clips, plus killer LED lighting on the windscreen.
Sorry to to hi-jack the thread, okay not really.
__________________
"Blind acceptance is a sign, of stupid fools who stand in line."
|
|
|
|
|
01-08-2015, 07:25 AM
|
#3
|
|
On the slippery slope
Join Date: Mar 2014
Location: Austin and Palm Springs
Posts: 3,800
|
I think this thread is about the mesh windscreens behind the seats, not the center one
Great idea & DIY
Just need some pics
__________________
2004 Boxster S 6 speed - DRL relay hack, Polaris AutoTop DIY
2004 996 Targa Tip
Instructor - San Diego region
2014 Porsche Performance Driving School
2020 BMW X3, 2013 Ram 1500, 2016 Cmax, 2004 F-150 "Big Red"
Last edited by JayG; 01-08-2015 at 07:47 AM.
|
|
|
|
|
01-08-2015, 07:53 AM
|
#4
|
|
Registered User
Join Date: Oct 2012
Location: Wake Forest, NC
Posts: 867
|
Quote:
Originally Posted by Slate 01

Better yet, purchase nine8six kickass windscreen and gain an illuminum frame with aluminum clips, plus killer LED lighting on the windscreen.
Sorry to to hi-jack the thread, okay not really.
|
Hmm... no. You're not getting a frame, illuminum or aluminum, nor are you getting new clips:
http://986forum.com/forums/429117-post172.html
__________________
2000 Boxster S, 6 speed, Sport Package, Litronics, LED tail lights, LNE IMS-B, OBC, Skybreaker wind deflector, Arctic Silver/Graphite Grey
|
|
|
|
|
01-08-2015, 08:20 AM
|
#5
|
|
Registered User
Join Date: Sep 2013
Location: Montreal, QC. (currently expat to Shanghai)
Posts: 3,249
|
Pretty quickly dropped the idea of getting 3D models & CAM work, fixtures and all that's needed to get those clip done lol They would have cost a fortune once CNC'ed and anodized.
Can't compete with an item that now cost $4.99 (see suncoast's website). Used to be so much more expansive at the time... hence where the idea of getting some made out of AL came from.
Seriously, remember paying $60 from a seller back in the days :/ Glad to see they are almost free now - about time
__________________
______________________________
'97 Boxster base model 2.5L, Guards Red/Tan leather, with a new but old Alpine am/fm radio.
|
|
|
|
|
01-08-2015, 08:21 AM
|
#6
|
|
Registered User
Join Date: Sep 2013
Location: Montreal, QC. (currently expat to Shanghai)
Posts: 3,249
|
James, you owe us pics of your set-up mate! Nice write up
__________________
______________________________
'97 Boxster base model 2.5L, Guards Red/Tan leather, with a new but old Alpine am/fm radio.
|
|
|
|
|
01-08-2015, 08:55 AM
|
#7
|
|
Custom User Title Here
Join Date: Mar 2012
Location: Ft. Leonard Wood
Posts: 6,169
|
There's thinking outside of the box...very Rube Goldbergian.
It's not nearly as creative, but I just used zip ties on my friends 986. He was missing a tab on each mesh, so I figured zip ties would work best (they should be zip tied for security, anyway, so 2 problems solved with 1 zip tie  ).
__________________
https://youtube.com/@UnwindTimeVintageWatchMuseum
Last edited by particlewave; 01-08-2015 at 08:58 AM.
|
|
|
|
|
01-08-2015, 01:30 PM
|
#8
|
|
Registered User
Join Date: Jan 2015
Location: WA
Posts: 5
|
Hi all, new boxster owner here ('99 base). I just sit back and learn, but I did run into the broken tab problem. My solution is not for everyone, but if you work with epoxy, you can make new tabs. I taped up the roll bar with packing tape to protect it from my sloppiness, taped the screen to the roll bar, then built new tabs with epoxy fillet compound. Then I followed with an easy sanding fairing compound followed by black paint. If you're patient, you can get the tabs as nice as you like. Mine is about a one-foot job. LOL, looks good from one foot away. The two leftmost tabs in the photo were built from scratch. Also, I scored the plastic to get some tooth for the fillet compound.

|
|
|
|
|
01-08-2015, 04:30 PM
|
#9
|
|
Beginner
Join Date: Mar 2013
Location: Houston
Posts: 1,659
|
Quote:
Originally Posted by Nine8Six
James, you owe us pics of your set-up mate! Nice write up
|
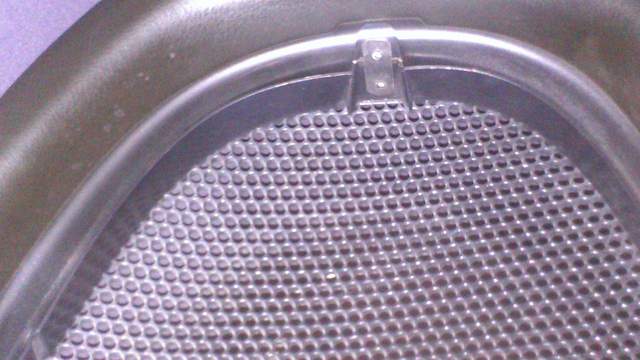
Oh yeah, pictures are needed or it didn't happen. This is the top tab and cannot be seen unless the passenger seat is tilted forward and you look up at it from the back of the seat. This shot is a close up almost straight up from behind the seat. Since I can not see it, I didn't bother to hide, or even paint the pop rivets to hide them. For the lower tabs a bit of filing, epoxy and paint would go a long way towards hiding the repair. The reason I like this repair is that its a more robust solution than adhesive, at least any adhesives I'm familiar with. The spring action of the hacksaw blade also makes it easy to remove and install without breaking another tab.
__________________
2003 S manual
|
|
|
|
|
01-08-2015, 04:50 PM
|
#10
|
|
Beginner
Join Date: Mar 2013
Location: Houston
Posts: 1,659
|
Quote:
Originally Posted by Nine8Six
Pretty quickly dropped the idea of getting 3D models & CAM work, fixtures and all that's needed to get those clip done lol They would have cost a fortune once CNC'ed and anodized.
Can't compete with an item that now cost $4.99 (see suncoast's website). Used to be so much more expansive at the time... hence where the idea of getting some made out of AL came from.
Seriously, remember paying $60 from a seller back in the days :/ Glad to see they are almost free now - about time
|
Can you post a link to this? It eludes me on the Suncoast site.
__________________
2003 S manual
|
|
|
|
|
01-08-2015, 04:56 PM
|
#11
|
|
Registered User
Join Date: Sep 2013
Location: Montreal, QC. (currently expat to Shanghai)
Posts: 3,249
|
Quote:
Originally Posted by Jamesp
Can you post a link to this? It eludes me on the Suncoast site.
|
Bummers... the price is going up again. Inflation stuff... goes up one day, down the other huh lol
https://www.****************************************************.com/product//986WSCLIP.html
^ that of course is ref to what was discussed later on your thread mate. Noting to do with the mesh tabs fix you kindly suggested. Apologies if this creates confusions
__________________
______________________________
'97 Boxster base model 2.5L, Guards Red/Tan leather, with a new but old Alpine am/fm radio.
|
|
|
|
|
01-08-2015, 04:58 PM
|
#12
|
|
Beginner
Join Date: Mar 2013
Location: Houston
Posts: 1,659
|
Quote:
Originally Posted by Nine8Six
|
Ah, that clip, apples and oranges. Thanks for the link. Do you have any more lit windscreens available? Very nice indeed.
__________________
2003 S manual
|
|
|
|
|
01-08-2015, 05:21 PM
|
#13
|
|
Registered User
Join Date: Sep 2013
Location: Montreal, QC. (currently expat to Shanghai)
Posts: 3,249
|
Quote:
Originally Posted by Jamesp
Ah, that clip, apples and oranges. Thanks for the link. Do you have any more lit windscreens available? Very nice indeed.
|
For a guy like yourself, I have millions mate. Even if I run out quick I'll do a one off just for you.
Keep up the tech ideas and contributions coming man, ref to other thread you've contributed. Clearly you know your stuff......
__________________
______________________________
'97 Boxster base model 2.5L, Guards Red/Tan leather, with a new but old Alpine am/fm radio.
|
|
|
|
|
01-08-2015, 05:23 PM
|
#14
|
|
Registered User
Join Date: Jan 2015
Location: WA
Posts: 5
|
Quote:
Originally Posted by Jamesp
The reason I like this repair is that its a more robust solution than adhesive, at least any adhesives I'm familiar with.
|
Your solution is far more robust than epoxy on plastic! Alas, I bought my boxster with the screen already broken and the small pieces were missing. If my bottom tab snaps, I'll drill out and use a bonded fastener from behind. Your rivets gave me that idea.
Hiding the blade with fairing putty or what have you, as you suggest, would be a much better way to go than starting new tabs from scratch.
|
|
|
|
|
01-08-2015, 05:33 PM
|
#15
|
|
Beginner
Join Date: Mar 2013
Location: Houston
Posts: 1,659
|
Quote:
Originally Posted by Nine8Six
For a guy like yourself, I have millions mate. Even if I run out quick I'll do a one off just for you.
Keep up the tech ideas and contributions coming man, ref to other thread you've contributed. Clearly you know your stuff......
|
Sending you a pm
__________________
2003 S manual
|
|
|
|
|
05-23-2016, 06:57 PM
|
#16
|
|
Registered User
Join Date: Nov 2013
Location: Emerald City
Posts: 885
|
I'm going to respond to this to tell my quick success story. I've had broken tab wind screens since I bought the car. Unlike James, I did not have the other piece of the tab so mine were pretty much useless. Had both bottom tabs but the top tab was gone. Hemmed and hawed on spending the coin to buy new ones until I found this thread.
Pretty simple repair and embarrassed I waited this long. Bought hack saw blades, rivets and a rivet gun. Had a rotary tool but honestly you don't need it. Broke off a piece of hacksaw blade, I did about two inches. Drilled a hole on the base l close to the back of the tab area. Did the same on one side of the blade. Used the rivet to put them together. Then bent the front half of the blade up enough to create a snug fit. Fed the bent part into the groove at the top of the roll bar then locked in the bottom tabs. Adjust as needed to ensure a tight fit. Better to have too much blade length so you can either break it off or cut it if needed. Mine now fit snug and arguably better than new. Will try to get some pics in a few days.
|
|
|
|
 Posting Rules
|
You may not post new threads
You may not post replies
You may not post attachments
You may not edit your posts
HTML code is On
|
|
|
All times are GMT -8. The time now is 02:02 PM.
| |


 2004 Porsche Boxster S
 2004 Porsche 996 Targa
 Boxster S
 Genesis 3.8
 Linear Mode


