Go Back   986 Forum - The Community for Porsche Boxster & Cayman Owners > Porsche Boxster & Cayman Forums > DIY Project Guides

Post Reply
 
LinkBack Thread Tools Display Modes
Old 04-01-2017, 07:56 AM   #1
Custom User Title Here
 
particlewave's Avatar
 
Join Date: Mar 2012
Location: Ft. Leonard Wood
Posts: 6,164
Garage
I replied to you on Facebook, Craig. If can lock/unlock with the key, then there's no reason that the keyless entry module wouldn't work. Can you post pictures of the instructions that came with it and a close up of the wires you tapped for all connections?
particlewave is offline   Reply With Quote
Old 04-01-2017, 09:11 AM   #2
Registered User
 
Join Date: Apr 2017
Posts: 18
Quote:
Originally Posted by particlewave View Post
I replied to you on Facebook, Craig. If can lock/unlock with the key, then there's no reason that the keyless entry module wouldn't work. Can you post pictures of the instructions that came with it and a close up of the wires you tapped for all connections?
Put photos on Facebook as easier. I'm having the exact symptoms as switchcomb. As he needed to reverse the unlock/lock function. ( also tried a different remote kit to rule that out)
Craig030774 is offline   Reply With Quote
Old 04-08-2017, 06:21 PM   #3
Custom User Title Here
 
particlewave's Avatar
 
Join Date: Mar 2012
Location: Ft. Leonard Wood
Posts: 6,164
Garage
If you need help adding the relay, just ask. It will be fine under the seat.
particlewave is offline   Reply With Quote
Old 04-09-2017, 06:08 AM   #4
Registered User
 
joecal's Avatar
 
Join Date: Jul 2015
Location: LaGrange Highlands,IL
Posts: 181
Quote:
Originally Posted by particlewave View Post
If you need help adding the relay, just ask. It will be fine under the seat.
Thanks for the offer! I do need help with the wiring of it, I have a Bosch 5 pin relay I was going to use. I know I don't need to use all 5 pins, probably 4 pins? I really don't know much about the working of relays. I've watched a few videos but I'm still unsure of how to wire it.
Thanks!
__________________
1999 Boxster base w/sport package Ocean Blue Metallic/Savanna Beige
joecal is offline   Reply With Quote
Old 04-09-2017, 09:54 AM   #5
Custom User Title Here
 
particlewave's Avatar
 
Join Date: Mar 2012
Location: Ft. Leonard Wood
Posts: 6,164
Garage
Can you test the purple wire to see if it's 12V+ or ground when the trunk button is pressed on the remote?
particlewave is offline   Reply With Quote
Old 04-09-2017, 10:37 AM   #6
Registered User
 
joecal's Avatar
 
Join Date: Jul 2015
Location: LaGrange Highlands,IL
Posts: 181
Quote:
Originally Posted by particlewave View Post
Can you test the purple wire to see if it's 12V+ or ground when the trunk button is pressed on the remote?
It appears to be ground, I checked it with a test light.
__________________
1999 Boxster base w/sport package Ocean Blue Metallic/Savanna Beige
joecal is offline   Reply With Quote
Old 04-09-2017, 11:08 AM   #7
Custom User Title Here
 
particlewave's Avatar
 
Join Date: Mar 2012
Location: Ft. Leonard Wood
Posts: 6,164
Garage
Ground when the remote button is pressed, but nothing (no light) when it's not pressed?
particlewave is offline   Reply With Quote
Old 04-09-2017, 11:19 AM   #8
Registered User
 
joecal's Avatar
 
Join Date: Jul 2015
Location: LaGrange Highlands,IL
Posts: 181
Quote:
Originally Posted by particlewave View Post
Ground when the remote button is pressed, but nothing (no light) when it's not pressed?
That is correct!
__________________
1999 Boxster base w/sport package Ocean Blue Metallic/Savanna Beige
joecal is offline   Reply With Quote
Old 04-09-2017, 11:45 AM   #9
Registered User
 
joecal's Avatar
 
Join Date: Jul 2015
Location: LaGrange Highlands,IL
Posts: 181
Thanks for the quick reply, I really appreciate all your help! I did see his diagram and I think you're right the trunk seems the best or maybe the only way to go. The red wire from the actuator would need to be tapped into relay (pin 86), so I'm not sure how you would do that from under the seat. Thanks again particlewave, you're a great asset to this forum!
__________________
1999 Boxster base w/sport package Ocean Blue Metallic/Savanna Beige

Last edited by joecal; 04-09-2017 at 11:49 AM.
joecal is offline   Reply With Quote
Old 04-09-2017, 03:39 PM   #10
Custom User Title Here
 
particlewave's Avatar
 
Join Date: Mar 2012
Location: Ft. Leonard Wood
Posts: 6,164
Garage
Do you have a DVM with continuity check? If not, a simple test light will work.
The best way would be to disconnect the door harness at the door jamb and test every switch from there. The pins on the door jamb connector should be numbered, but I can't check until tomorrow.

Let me know what you have for testing and I'll write up some instruction for testing everything (test will be the same for both doors and I suggest doing both). The test shouldn't take more than 10 minutes, but you'll really need a second person to pull the levers and turn the key while you probe the contacts.
particlewave is offline   Reply With Quote
Old 04-09-2017, 03:54 PM   #11
Registered User
 
Swhitcomb's Avatar
 
Join Date: Dec 2013
Location: Ranson wv
Posts: 237
I do have a DVM. I really appreciate all your help so far. Thank you.
__________________
02 Boxster
71 VW Karmann Ghia
71 VW Super Beetle
Swhitcomb is offline   Reply With Quote
Old 04-09-2017, 06:17 PM   #12
Custom User Title Here
 
particlewave's Avatar
 
Join Date: Mar 2012
Location: Ft. Leonard Wood
Posts: 6,164
Garage
No problem

I'll write up some test procedures late tonight. Won't have time until then.
particlewave is offline   Reply With Quote
Old 04-10-2017, 03:47 PM   #13
Custom User Title Here
 
particlewave's Avatar
 
Join Date: Mar 2012
Location: Ft. Leonard Wood
Posts: 6,164
Garage
Door Latch Microswitch Testing


Disconnect battery.
Open door fully and remove T20 Torx screw from bottom of connector.
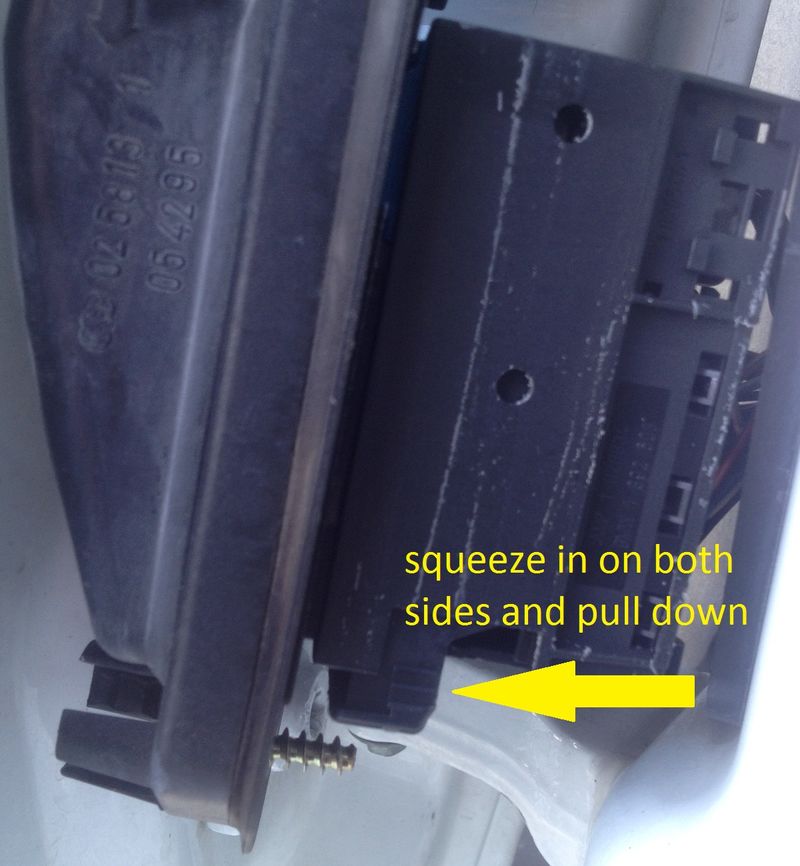
Push connector up to release the top latch and pull the connector assembly out from door frame.
Push tabs on both sides of the bottom of the connector while pulling it down to unlock the cam.
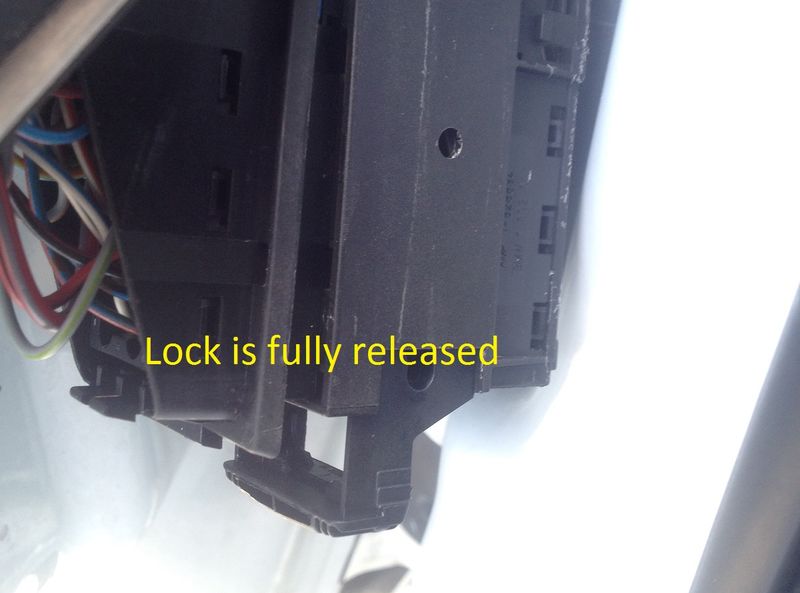
Inset a flat blade screwdriver and gently pry the cam lock down to fully release it, then separate the door side connector from the car side.


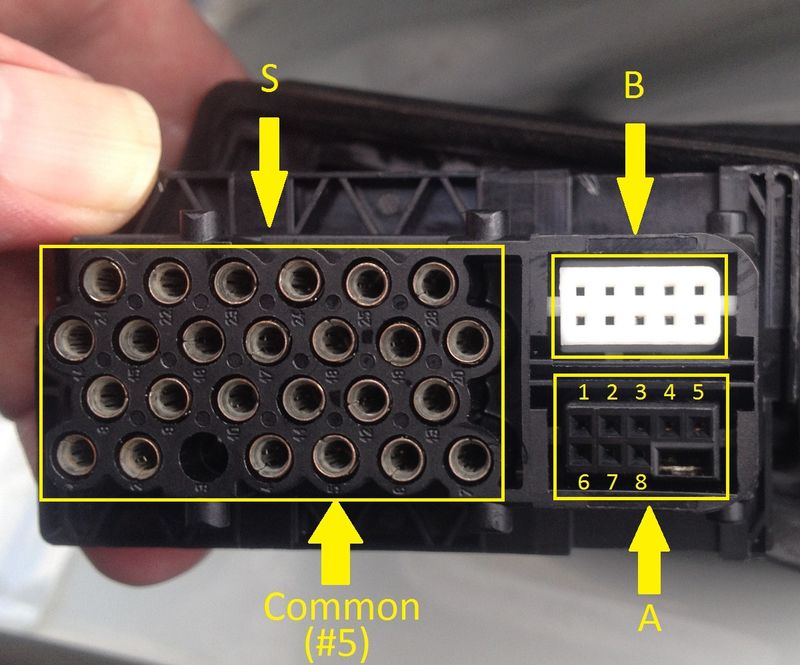
The are 3 connectors inside; the main connector for the larger round pins and 2 smaller connectors. The large connector is designated "S". The small black connector is designated "A". The small white connector is designated "B".

You will be using the S5 pin on the larger connector and the pins on the smaller black connector only.

Set your DVM to continuity check.


1) Door Contact
Place one probe in S5 (common) and the other probe into A8 (you may need to use a paperclip or small wire inserted into the connector as the holes are very small in the 2 smaller connectors).
With the door latch open, you should read continuity.
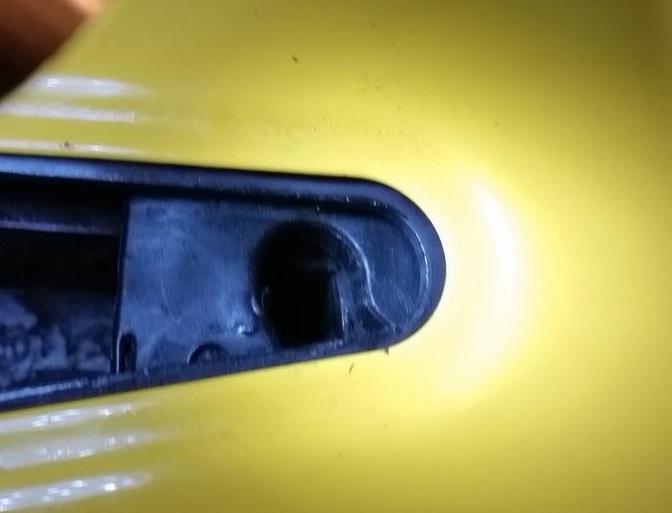
Use a screwdriver to close the door latch (should look like the picture below).
You should now read no continuity.


Keep the latch closed for now.

2) Inside and Outside Door Handles
Insert one probe into A8 and the other into A3.
With the door latch closed, you should read no continuity.
Pull the inside door handle slightly (not enough to release the door latch) and you should read continuity.
Repeat for the outside door handle (ensure the latch is still closed).

Pull the handle fully to release the door latch, then use the screwdriver to push the latch fully open.
Keep one probe in A3 and place the other into S5.
You should read continuity.

3)Key Cylinder Function
Place one probe into S5 and the other into A2.
You should read no continuity.
Insert the key into the door lock and turn to LOCK position.
You should read continuity.

Place one probe into S5 and the other into A6.
You should read no continuity.
Insert the key into the door lock and turn to UNLOCK position.
You should read continuity.

Repeat for passenger door, minus the lock cylinder test.

Last edited by particlewave; 04-10-2017 at 08:23 PM.
particlewave is offline   Reply With Quote
Old 04-10-2017, 06:30 PM   #14
Registered User
 
Swhitcomb's Avatar
 
Join Date: Dec 2013
Location: Ranson wv
Posts: 237
Wow. Those are very detailed and concise directions. That's exactly what I needed and I really appreciate you taking what must've been hours to type them up.
__________________
02 Boxster
71 VW Karmann Ghia
71 VW Super Beetle
Swhitcomb is offline   Reply With Quote
Old 04-15-2017, 08:34 AM   #15
Registered User
 
Swhitcomb's Avatar
 
Join Date: Dec 2013
Location: Ranson wv
Posts: 237
Finally had time to do all those tests. The door lock mechanism on the on the drivers side is bad. No continuity at all locking or unlocking. Now I know where to start.
__________________
02 Boxster
71 VW Karmann Ghia
71 VW Super Beetle
Swhitcomb is offline   Reply With Quote
Old 04-15-2017, 03:29 PM   #16
Registered User
 
Swhitcomb's Avatar
 
Join Date: Dec 2013
Location: Ranson wv
Posts: 237
Correction. When locking there is no continuity between s5 and a2 where there should be. Woody says $50 plus shipping. Looks like that's at least part of the solution. While I had my tools out and was in a work on the Boxster mood, I finally replaced the fuel door actuator. What a pain in the ass. I've been dreading doing it for a while. I looked on the package it came in. November of 2015.
__________________
02 Boxster
71 VW Karmann Ghia
71 VW Super Beetle
Swhitcomb is offline   Reply With Quote
Old 04-15-2017, 11:14 PM   #17
Custom User Title Here
 
particlewave's Avatar
 
Join Date: Mar 2012
Location: Ft. Leonard Wood
Posts: 6,164
Garage
Quote:
Originally Posted by Swhitcomb View Post
Correction. When locking there is no continuity between s5 and a2 where there should be. Woody says $50 plus shipping. Looks like that's at least part of the solution. While I had my tools out and was in a work on the Boxster mood, I finally replaced the fuel door actuator. What a pain in the ass. I've been dreading doing it for a while. I looked on the package it came in. November of 2015.
Let's hope the replacement latch solves your issues!
particlewave is offline   Reply With Quote
Old 04-10-2017, 07:59 PM   #18
Custom User Title Here
 
particlewave's Avatar
 
Join Date: Mar 2012
Location: Ft. Leonard Wood
Posts: 6,164
Garage
No trouble.
Between doing the testing myself, adding text to the pictures and typing it up, maybe an hour. I figure it will be a good resource for the community.
I've been meaning to do it for quite a while, anyway. The wiring diagram is not very clear and it's good to know what's going on in there.

There were still 2 contacts that I couldn't test. The "door safe" and "lock" contact (not the lock cylinder lock). I think they are probably tied to the latch motors to let the car know when the latch is locked out when the car is in motion. I'm really not sure. Seems like the motors will need to be powered to test them and you cant do that easily.

I'll do some thinking on it and try to test more next time I get the car out. I will have to pull the connector anyway because the "B" connector on the car side got pushed in and I couldn't fish it out of the frame before it started to rain. That connector is for the power mirror adjust.

Last edited by particlewave; 04-10-2017 at 08:33 PM.
particlewave is offline   Reply With Quote
Old 04-10-2017, 08:22 PM   #19
Custom User Title Here
 
particlewave's Avatar
 
Join Date: Mar 2012
Location: Ft. Leonard Wood
Posts: 6,164
Garage
..........
particlewave is offline   Reply With Quote
Old 04-29-2017, 05:30 PM   #20
Custom User Title Here
 
particlewave's Avatar
 
Join Date: Mar 2012
Location: Ft. Leonard Wood
Posts: 6,164
Garage
Did you test both doors?
particlewave is offline   Reply With Quote
Post Reply


Posting Rules
You may not post new threads
You may not post replies
You may not post attachments
You may not edit your posts

BB code is On
Smilies are On
[IMG] code is On
HTML code is On
Trackbacks are On
Pingbacks are On
Refbacks are On


All times are GMT -8. The time now is 09:13 AM.


Powered by vBulletin® Version 3.8.7
Copyright ©2000 - 2025, vBulletin Solutions, Inc.
Content Relevant URLs by vBSEO 3.6.0
Copyright 2025 Pelican Parts, LLC - Posts may be archived for display on the Pelican Parts Website -    DMCA Registered Agent Contact Page