 04-08-2013, 10:17 PM
|
#1
|
|
Custom User Title Here
Join Date: Mar 2012
Location: Ft. Leonard Wood
Posts: 6,169
|
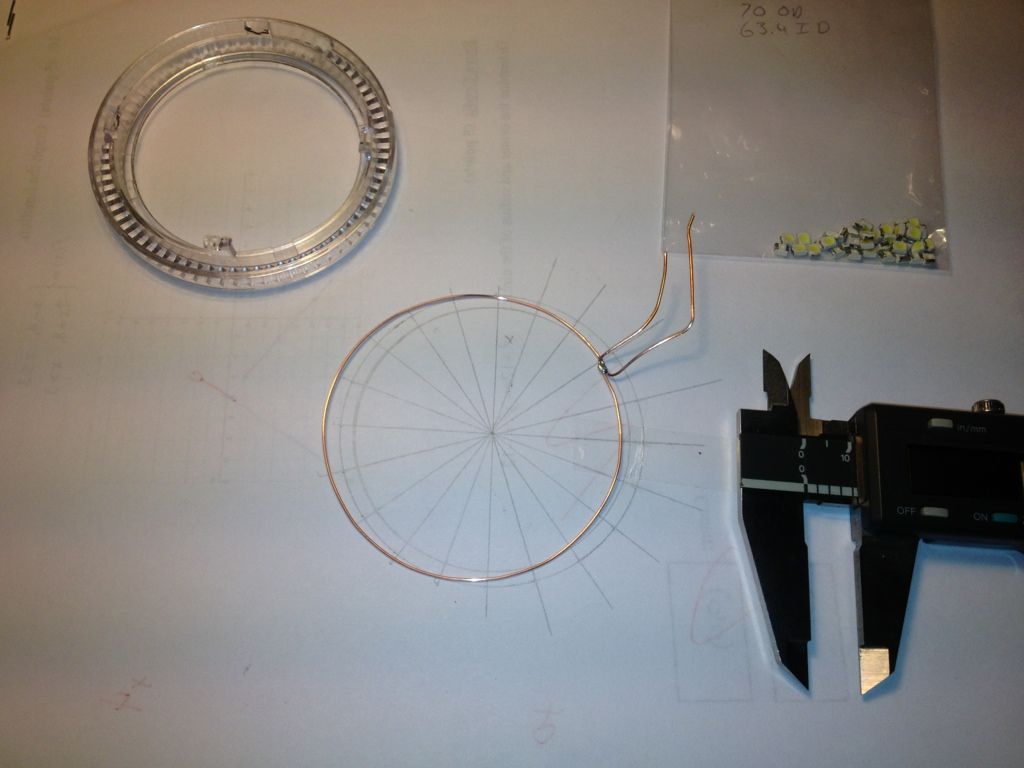
DIY LED angel eyes...why? Because I can
I broke one of my CCFL angel eyes during installation, so rather than order a new tube, I decided to go with LEDs for longer life. I ordered a set, but they did not fit, so here we go.
About a 1 hour job...

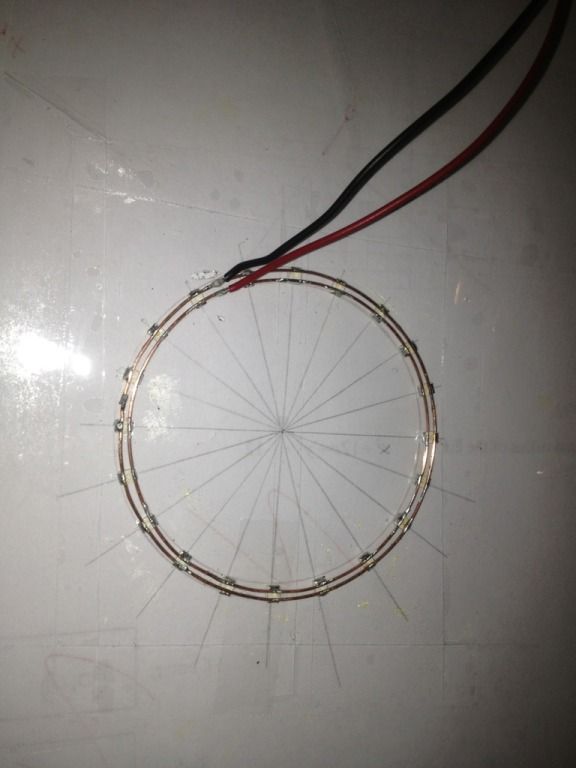
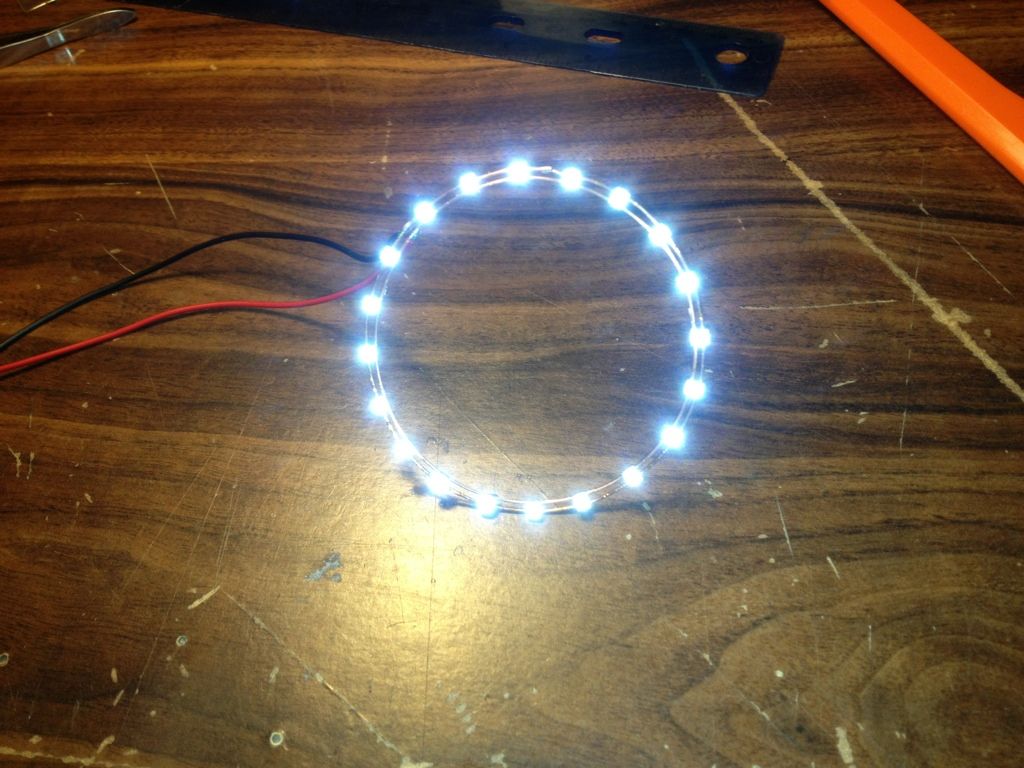
Just a low power test. Will be much brighter under full power. 
Will post more pics after installation.
I may be a little OCD ")
__________________
https://youtube.com/@UnwindTimeVintageWatchMuseum
Last edited by particlewave; 04-09-2013 at 09:21 AM.
|

|

|
|
04-09-2013, 01:42 PM
|
#2
|
|
still plays with cars...
Join Date: May 2011
Location: Baden, ON, Canada
Posts: 1,088
|
Quote:
|
I may be a little OCD
|
Good... you're not saying that like it's a bad thing. I've got the t-shirt & bumpersticker too. 
Can't wait to see the finished product.
__________________
Six speed 2000 Boxster S
Arctic Silver on Metropol Blue | LN Dual Row IMSR | Arctic Silver console, spoiler frame & bumperettes | Crios mod | Technobrace | RoboTop module & modified convertible top relay for one-touch roof operation
|
|
|
|
|
04-09-2013, 03:08 PM
|
#3
|
|
Registered User
Join Date: Sep 2009
Location: toronto
Posts: 2,668
|
I have angel eyes.....but they are in my head 
Where do these go? Nice work at any rate !
__________________
986 00S
|
|
|
|
|
04-09-2013, 05:10 PM
|
#4
|
|
Custom User Title Here
Join Date: Mar 2012
Location: Ft. Leonard Wood
Posts: 6,169
|
Quote:
Originally Posted by jaykay

I have angel eyes.....but they are in my head
Where do these go? Nice work at any rate ! |
They go around the projector lens and will function as daytime running lamps
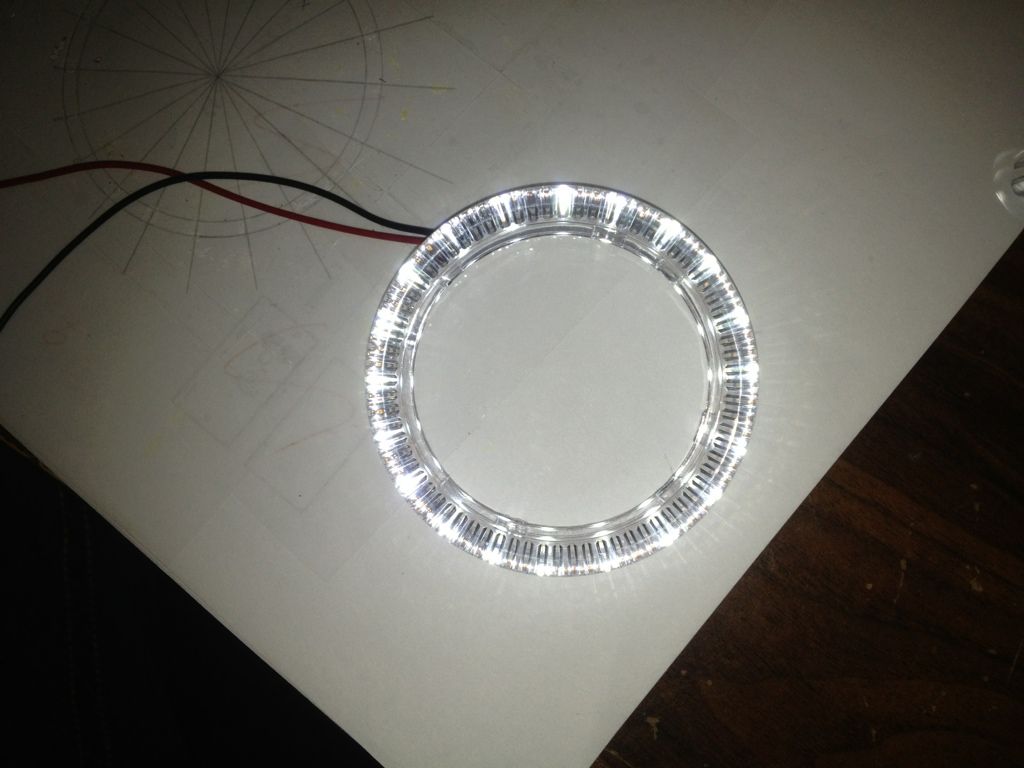
Here is a pic of the cold cathode fluorescent light that was originally in them before I decided to mess with it and break it

__________________
https://youtube.com/@UnwindTimeVintageWatchMuseum
|
|
|
|
|
04-11-2013, 10:17 PM
|
#5
|
|
Registered User
Join Date: Aug 2010
Location: Philadelphia
Posts: 97
|
Looks like Tony Stark's chest reactor in that picture!
|
|
|
|
|
04-12-2013, 08:36 AM
|
#6
|
|
Custom User Title Here
Join Date: Mar 2012
Location: Ft. Leonard Wood
Posts: 6,169
|
Quote:
Originally Posted by Tieniber
Looks like Tony Stark's chest reactor in that picture!
|
Haha! My son said the same thing
__________________
https://youtube.com/@UnwindTimeVintageWatchMuseum
|
|
|
|
|
04-12-2013, 08:55 AM
|
#7
|
|
Custom User Title Here
Join Date: Mar 2012
Location: Ft. Leonard Wood
Posts: 6,169
|
This project has been on hiatus for a while due to work and school, but I'm hoping to get it wrapped up early next week.
Calculating resistance...
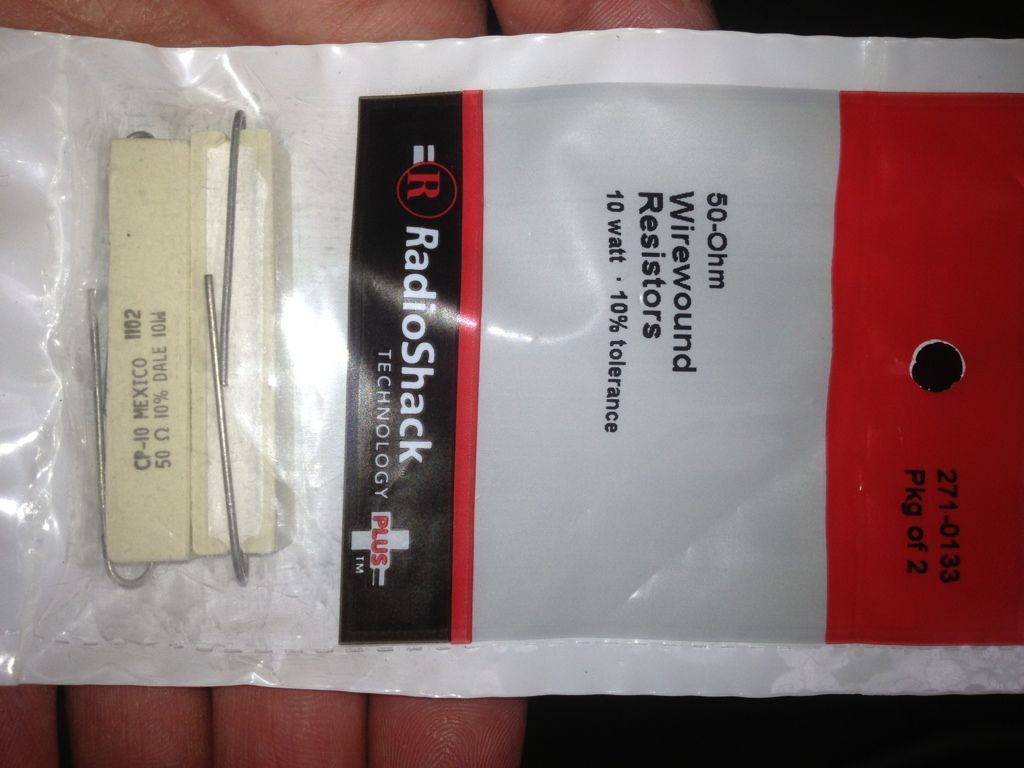
12v to 3v with 20 LEDs @ 20mA each(400mA total) puts me at about 23ohms and 5watts for the resistor. Stopped by Radio Shack to see what I could find.
The best combination that they had was 2x 50ohm 10watt resistors. Running them in parallel will give me 25ohms @ 20 watts...a little overkill on the wattage, but better over than under.
FYI: I opted to run the LEDs in parallel so that if one goes out, it will not affect the rest. This will also make it easier to identify a bad LED for replacement.
Another advantage is that the electrical contacts also serve as a frame, making it a tidy package.
Yeah, they're big!
__________________
https://youtube.com/@UnwindTimeVintageWatchMuseum
|
|
|
|
|
04-12-2013, 04:55 PM
|
#8
|
|
Custom User Title Here
Join Date: Mar 2012
Location: Ft. Leonard Wood
Posts: 6,169
|
The install is finally finished!
I just need to attach the outer lenses and reinstall the headlights. These LED angel eyes are very bright! Much brighter than the CCFLs. I had trouble getting them to show up in the pictures...
This is the angel eye DRLs only, headlights are not on
Not bad for 9.6 watts, eh?


Lights off pic...

__________________
https://youtube.com/@UnwindTimeVintageWatchMuseum
Last edited by particlewave; 04-12-2013 at 05:07 PM.
|
|
|
|
|
04-16-2013, 05:39 PM
|
#9
|
|
Registered User
Join Date: Nov 2008
Location: MA
Posts: 255
|
Looks awesome! nice work! This led me to think of a version where the LEDs are more spaced out on the ring and fewer, kinda of the range rover look.
|
|
|
|
|
04-16-2013, 08:00 PM
|
#10
|
|
1999 base
Join Date: Dec 2011
Location: Coral Springs FL
Posts: 1,617
|
What are you using to reattach the lance ?
|
|
|
|
|
04-16-2013, 08:46 PM
|
#11
|
|
Custom User Title Here
Join Date: Mar 2012
Location: Ft. Leonard Wood
Posts: 6,169
|
Thanks!
I just used Permatex black silicone adhesive sealant. After some research, it seemed to be an ok solution. I've used it before and it seals well and softens up at about 200F degrees, so should be easier to remove than the stock adhesive. The project has been done since Friday, but I've been waiting for decent weather to get the car out and snap some pics. It's been cold, cloudy, and rainy for days 
Here are some in the garage pics, but the lighting is bad. Loving the new headlights! They are a huge improvement over stock
Please ignore the bug spatter and messy garage...been too cold for a wash


__________________
https://youtube.com/@UnwindTimeVintageWatchMuseum
Last edited by particlewave; 04-16-2013 at 08:50 PM.
|
|
|
|
|
04-16-2013, 11:20 PM
|
#12
|
|
Registered User
Join Date: Jan 2011
Location: Peoples Republic of Kaliforneea
Posts: 686
|
Damn! I too thought of Starks enterprise as I was reading your post. Awesome job!
__________________
02 Boxster (DD sans kids)
03 Dodge Ram Quad Cab (Stuff hauler)
06 Maserati Coupe Cambiocorsa (Personal weekend car)
06 Maserati Quattroporte (Family hauler)
08 Corvette Z06 (Track car)
|
|
|
|
|
04-17-2013, 05:06 AM
|
#13
|
|
1999 base
Join Date: Dec 2011
Location: Coral Springs FL
Posts: 1,617
|
Thanks for the info.
That looks great.
|
|
|
|
|
04-17-2013, 06:40 AM
|
#14
|
|
Homeboy981
Join Date: Jan 2012
Location: Sherman, TX
Posts: 663
|
How do they attach? Are they floating or are there some hidden wires?
Good job on the work....we ALL here because we are at least a little OCD, don't let that stop you. It used to be a good thing, until Big Pharma made a pill for it!
I would rather work on projects like this, than medicate! My Porsche is my medicine and I take it every day!
__________________
2002 Porsche Boxtser S - Silver & Chrome - Died from IMS failure AFTER IMS was replaced!
|
|
|
|
|
04-17-2013, 09:54 AM
|
#15
|
|
Custom User Title Here
Join Date: Mar 2012
Location: Ft. Leonard Wood
Posts: 6,169
|
Quote:
Originally Posted by Homeboy981
How do they attach? Are they floating or are there some hidden wires?
|
If you look at the very first pic, you'll see the plastic ring/lens housing which snaps into the projector shroud. The LEDs are mounted into that...
Or did you mean the projector itself? It mounts into the low beam bulb socket. I didn't take many pics during the install, but here is one. You can see the threaded portion of the projector that passes through the original low beam socket and the large nut that threads onto it. On the front side(side facing the original reflector) there is a thick silicone grommet(about an inch thick) that conforms to the shape of the reflector and serves as somewhat of a shock absorber, allowing the projector to move a tiny bit under stress(bumps in the road).

__________________
https://youtube.com/@UnwindTimeVintageWatchMuseum
|
|
|
|
|
04-29-2013, 04:03 PM
|
#16
|
|
2006 987
Join Date: Dec 2006
Location: st. louis
Posts: 443
|
isn't angel eyes a BMW thing? To me, modding a Porsche to have a feature of a BMW is a downgrade. Reminds me of those people that put the side mesh air vents on the side of everything
ya buddy, lots of air getting in the door now!
come on guys, you drive a porsche, not a chevy or honda
__________________
2006 987 2.7 manual silver/black, PASM, OEM drilled rotors, heated seats
1998 986 2.5 manual black/tan with bad engine = SOLD
|
|
|
|
|
04-29-2013, 07:07 PM
|
#17
|
|
Registered User
Join Date: Mar 2012
Location: Arizona
Posts: 720
|
Quote:
Originally Posted by 986_inquiry
isn't angel eyes a BMW thing? To me, modding a Porsche to have a feature of a BMW is a downgrade. Reminds me of those people that put the side mesh air vents on the side of everything
ya buddy, lots of air getting in the door now!
come on guys, you drive a porsche, not a chevy or honda |
If I recall, you were a fan of the LED eye-liner that some of us have on our cars.
You know that's also an AUDI thing right?
|
|
|
|
|
05-04-2013, 09:41 AM
|
#18
|
|
Custom User Title Here
Join Date: Mar 2012
Location: Ft. Leonard Wood
Posts: 6,169
|
Quote:
Originally Posted by Homeboy981
I would rather work on projects like this, than medicate! My Porsche is my medicine and I take it every day!
|
Haha! Definitely
__________________
https://youtube.com/@UnwindTimeVintageWatchMuseum
Last edited by particlewave; 05-04-2013 at 02:36 PM.
|
|
|
|
|
05-11-2013, 12:01 PM
|
#19
|
|
Registered User
Join Date: Feb 2013
Location: Land of naught
Posts: 1,302
|
geez, I thought I was good with details! Great work Particlewave and thanks for the details. 
__________________
Death is certain, life is not.
|
|
|
|
|
05-11-2013, 10:53 PM
|
#20
|
|
Custom User Title Here
Join Date: Mar 2012
Location: Ft. Leonard Wood
Posts: 6,169
|
No prob
If I did it again, or if I open up the lights again for some reason, I would use twice as many LEDs for better coverage and change the resistors to dim the light output a bit. A white filter may also help distribute the light better.
All in all though, I'm pretty happy with the way they look
__________________
https://youtube.com/@UnwindTimeVintageWatchMuseum
|
|
|
|
 Posting Rules
|
You may not post new threads
You may not post replies
You may not post attachments
You may not edit your posts
HTML code is On
|
|
|
All times are GMT -8. The time now is 01:07 AM.
| |


 Udo
Udo boxster S
 "Bernie" - PONZI that 'made off' with my money!
 Boxster
 2006 Porsche Boxster 987
 Linear Mode


