 11-02-2004, 04:49 PM
|
#1
|
|
Registered User
Join Date: Oct 2003
Location: Maryland
Posts: 211
|
 Hardtop installation question
Okay guys. I've got a question. I just bought a hardtop and am going to pick it up on Thursday.
I had thought that I'd just buy the spinlocks and pop them in and then the hardtop just goes into the spinlocks, no problem.
I've now found that it seems that there is a bolt that has to go into the body as well, and I've no idea where this goes and how to get to it. I've heard you need to remove trim, I've heard you don't have to remove trim, but I've not figured out where this goes.
Can anyone help me out? I'm sure Toolpants knows. Any pictures would be greatly helpful.
Thanks,
JBG
|

|

|
|
11-02-2004, 06:38 PM
|
#2
|
|
Registered User
Join Date: May 2002
Location: San Jose
Posts: 1,889
|
We made a DVD last year of the spinlock install and top adjustment, with a few other projects on that DVD. We also made 2 other DVDs of other projects. They were all sold on ebay and on various boards, except Sky's board because every time they were mentioned by people who liked them he would delete the message.
We have also filmed hours of tape taken over several days on how to service your car and other projects, but I have not had the time to look at all the tape and get together with Henry to come out with another set of 3 DVDs.
I can walk you through the spinlock install once you get the parts. The top adjustment is a pain unless you have done it before.

|
|
|
|
|
11-03-2004, 04:10 AM
|
#3
|
|
Registered User
Join Date: Sep 2004
Posts: 29
|
Actually, I also just bought a hardtop, and have the instalation kit on order at the dealer (at absurd cost-$115.00). Toolpants, if you could give me a clue as to how to install the spinlocks, if that's what the little inserts are called, I'd be much obliged. I see where the bolts go, but am not sure how to reach them. Actually, if you still have the DVD, let me know.
Mike
|
|
|
|
|
11-03-2004, 09:26 AM
|
#4
|
|
Registered User
Join Date: Mar 2004
Location: Chester, England
Posts: 87
|
Having scratched my head for a few hours a month ao about this one here's the info. (its sooooo easy when you know how !!)
1. Remove the small carpetted corner section behind each seat - there's a small screw located about 3 inches up in the carpet pile itself, and a hex nut at the top against the roll bar
2. put the hood fully down, remove the blanking plugs and fit the spinlock sleeves (these are handed and labelled as such, and have a locating notch to make it foolproof). Tap fully down with small piece of wood.
3. Put hood fully up.
4. Carefully pull back the hood lining behind the side window glass. You will be able to see the side of the spinlock, with the receptacle for the bolt facing you. Place the securing nut and your 5mm allen key into a plastic sandwich bag (so if you loose connection the bolt doesn't disappear inside the panel), with the bolt threads sticking out of the corner of the bag.
5. LOcate the bolt and tighten til about 80% in, then pull off the bag and continue to fully tighten in a normal fashion
|
|
|
|
|
11-03-2004, 05:11 PM
|
#5
|
|
Registered User
Join Date: Oct 2003
Location: Maryland
Posts: 211
|
Wow. I got my install kit tonight and tried to put it in. Let me recount my install session  Oh, before I begin, thanks for your directions UKBXSTR and Tool Pants.
Kit: 2 spin locks, 2 bolts.
Cost with overnight shipping: 82.00
I put the top down all the way. Took out the 2 plastic covers. Put in the 2 spin locks, no problem. The passenger spin lock needed a few light taps in order for it to get it into the hole.
I took the screw off on the carpet panel by the door behind the seat. I went looking for this hex nut that UKBXSTR refered to, but could not find it. When I pulled at panel, it seemed still attached to the car, but I didn't want to pull too hard. I just left it hanging there as I could get my hand in there.
I put the top up in order to get to the recepticle for the bolt. I did as people have suggested and put the bolt into a sandwhich bag so that I didn't lose the bolt if I dropped it. So it took me quite a while to get the bolt threaded because I started on the driver side and I'm right handed. This caused me to have to use my left hand to try to thread the bolt. It took a lot longer than one would expect to put a bolt in because of where the recepticle was. After about 45 minutes of putzing with this, I finally got it all in and no problems. Of course, as I was screwing the last bit of the bolt in, the carpet panel popped off and I finally realized where the nut was that was holding it to the car. It was hidden close to the roll bar between the roll bar and the carpet on the top panel. It is at an angle and can really only be gotten to with an open wrench. I will have to admit that it is MUCH easier with the panel entirely off as you can get a better angle at the allen wrench.
I proceeded to do the same on the other side and was easier to thread because of the use of my right hand, but I had a tougher time screwing the bolt in because I think the recepticle was tighter on the passenger side than on the driver side. I backed the bolt a bit, and took my WD40 and sprayed it by putting the top down just enough to see the bolt. Be aware that you can't put the top down too much as it will hit the frame of the soft top.
Okay, so here is something that I had not thought too much of as I was working. Trying to get my fingers in there and tighten up the bolt, I dropped the allen wrench. I just about had a fit. I've got an allen wrench in a area that I can't see. I can barely reach in there with my fingers, let alone try to pick up a little allen wrench. And I did not dare to put the top down as the wrench was probably jammed in there and would no doubt hurt something. I was ticked off and trying to figure out how I was going to have to pull the car apart in order to get to this little allen wrench.
I had my girlfriend take a look and she reached her hands which is smaller than mine in there and rattled around and found the allen wrench. What a life saver. So, on top of what people are suggesting with the plastic baggy, I would suggest that perhaps you might want to tie a string to the allen wrench as you're working. Especially if you've had to spray WD40 on the bolt like I did to get it to scew in more smoothly.
Also, make sure that the bolt is FLUSH with the recepticle before you put the top all the way down. The arm of the top will hit the bolt as you lower the top if it is not in all the way. And on that note, I would suggest that you put some grease on the bolt before you put it into the recepticle. Just to make things go easier when you have to screw the bolt in.
So, I'm ready to go pick up my hardtop tomorrow. Thanks again for everyone fo your help. This is why I like this board so much. You ask a question, and there is always someone who will help.
JBG
__________________
"Insanity: doing the same thing over and over again and expecting different results." -- Albert Einstein
|
|
|
|
|
11-03-2004, 06:53 PM
|
#6
|
|
Registered User
Join Date: May 2002
Location: San Jose
Posts: 1,889
|
For the next guy, here is the 8 mm bolt/screw for the carpeted panel for the seal belt. You give it about 2 turns but do not remove it or it will drop into never land.
|
|
|
|
|
11-03-2004, 08:06 PM
|
#7
|
|
Registered User
Join Date: Oct 2003
Location: Maryland
Posts: 211
|
hey TP, do you actually have these pictures just handy? Or do you just go out there and take a pic and upload it?
If you have them on hand, thats incredible. If you take the pic, then you're really one of the nicest and most helpful people I know.
Just wondering
__________________
"Insanity: doing the same thing over and over again and expecting different results." -- Albert Einstein
|
|
|
|
|
11-04-2004, 07:43 AM
|
#8
|
|
Registered User
Join Date: May 2002
Location: San Jose
Posts: 1,889
|
Our local Boxster group has been tinkering with cars together for several years, and I take a lot of pictures. That was taken last year when we were filming for the DVDs.
|
|
|
|
|
11-04-2004, 12:25 PM
|
#9
|
|
Registered User
Join Date: Oct 2003
Location: Maryland
Posts: 211
|
Okay Jeff. I got my hardtop today but I'm having a problem. The top doesn't fit right on the driver side. Its as if its not slid forward enough. The window doesn't seem to close right and it rained on the way back. The back of the window had a space in it and the rain leaked in.
So I think what has happened is that I didn't tighten the bolt that holds the spinlock in place enough and when the top is going in and locking down, its pulling the spinlock up instead of locking the top down.
Does that sound about right? The other side is fine, adn I know I tightened that puppy up as much as my fingers would allow with a little allen wrench.
Any ideas? I looks like it needs to be more forward just about 1/8 of an inch.
__________________
"Insanity: doing the same thing over and over again and expecting different results." -- Albert Einstein
|
|
|
|
|
11-04-2004, 06:13 PM
|
#10
|
|
Registered User
Join Date: Oct 2003
Location: Maryland
Posts: 211
|
Okay, I took it back apart, and tightened up the driver side bolt again, put the top back on, and same problem.
Its not the spinlock. Perhaps there is a place to adjust the location of the spinlock?
__________________
"Insanity: doing the same thing over and over again and expecting different results." -- Albert Einstein
|
|
|
|
|
11-05-2004, 05:46 AM
|
#11
|
|
Registered User
Join Date: Mar 2004
Location: Chester, England
Posts: 87
|
JBG the only adjustment i know of is on the fron header rail, but these are merely locating lugs. Are you sure that the rear side pins on the hardtop are not damaged/bent, and that they were fully in to the spin lock before clamping down with the lever ??
|
|
|
|
|
11-05-2004, 07:55 AM
|
#12
|
|
Registered User
Join Date: Sep 2004
Posts: 29
|
Thanks everyone. I did my hardtop install last night, without problems. It seems to fit well, hasn't leaked yet. It's quieter and does seem to change the character of the car a little, making it feel more solid. My dealership on the other hand, has all the character of Ken Lay. they charged $115.00 for the 4 parts that make up the install kit!
|
|
|
|
|
11-05-2004, 10:46 AM
|
#13
|
|
Registered User
Join Date: Oct 2003
Location: Maryland
Posts: 211
|
Well, no I'm not certain, but I took it off of a guy's boxster, and directly put it onto mine. So I would say that the top seems to be fine. Can't really tell.
I'll take some pics and show you guys how its fitting.
JBG
__________________
"Insanity: doing the same thing over and over again and expecting different results." -- Albert Einstein
|
|
|
|
|
11-06-2004, 09:34 AM
|
#14
|
|
Registered User
Join Date: Oct 2003
Location: Maryland
Posts: 211
|
 Driver side
See how the top does not come up to the door line.
Last edited by JonnyBGood; 11-06-2004 at 09:37 AM.
|
|
|
|
|
11-06-2004, 09:36 AM
|
#15
|
|
Registered User
Join Date: Oct 2003
Location: Maryland
Posts: 211
|
passenger side
This is the passenger side. Note that the top if flush up against the door line.
|
|
|
|
|
11-06-2004, 09:38 AM
|
#16
|
|
Registered User
Join Date: Oct 2003
Location: Maryland
Posts: 211
|
Driver side window
Here is the window when its up. Notice the weather stripping on the window to the roof.
|
|
|
|
|
11-06-2004, 09:40 AM
|
#17
|
|
Registered User
Join Date: Oct 2003
Location: Maryland
Posts: 211
|
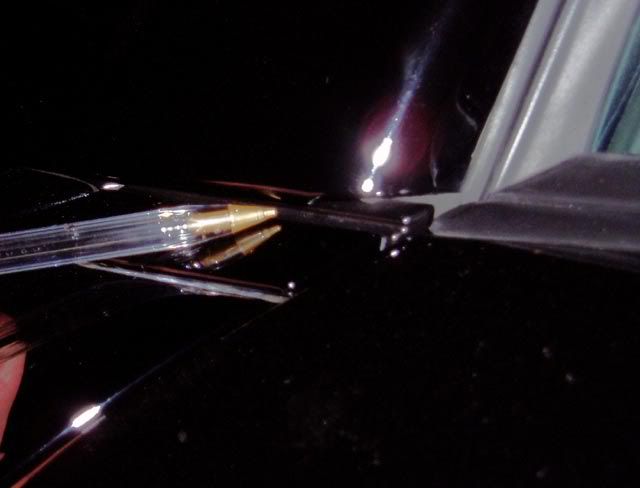
spin lock
Here is the spin lock on the inside. It looks good to me. Does ANYONE have an idea of what might be wrong before I shell out hundreds of bucks going to the dealership?
|
|
|
|
|
11-06-2004, 11:39 AM
|
#18
|
|
Registered User
Join Date: Mar 2004
Location: Chester, England
Posts: 87
|
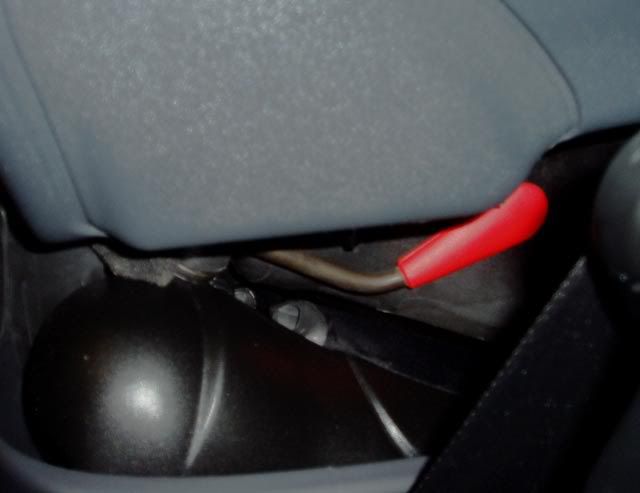
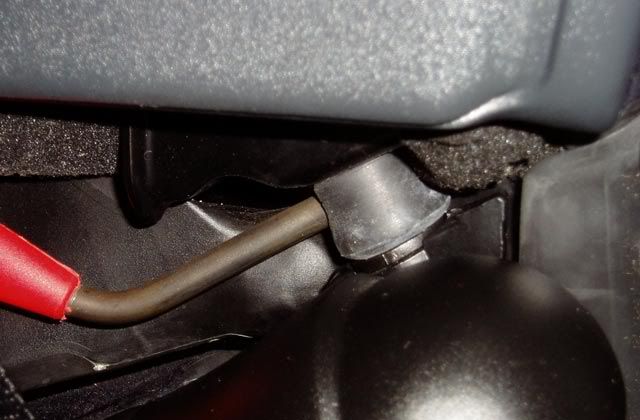
JBG.
both red clamping handles should be flush with the inside of the hardtop, looks like your rightside hasn't been rotated through 90'. In the last pic you can see the side lugs of the hardtop pin at the top of the spinlock.
You may need to release the lever on the opposite side, and then put the left one in first, then redo the right.
Here's a few pics of mine
right hand side, outside
right had side, inside
left hand side , outer

left hand side inner
|
|
|
|
|
11-06-2004, 12:00 PM
|
#19
|
|
Registered User
Join Date: Oct 2003
Location: Maryland
Posts: 211
|
Actually, yeah, that picture was the inside before I pushed the handle in. Once push it in, it looks like yours. I can't get to my pics right now as I'm doing something to the computer with the pics on, but I'll post one of those as well. I've tried left one first, then the right one. And I've tried the right one first then the left one. Its the same result. Its just like the entire spin lock needs to be moved forward about 1/4 inch.
__________________
"Insanity: doing the same thing over and over again and expecting different results." -- Albert Einstein
|
|
|
|
|
05-24-2006, 08:11 AM
|
#20
|
|
Registered User
Join Date: Apr 2006
Location: Scotland
Posts: 1
|
More straightforward than you think
Having read about this I was a bit apprehensive about tackling it. In fact it took 15 mins for the first side and less than 10 the next.
Here's my approach.
Pick a dry day! - hard here in Scotland.
Open top and drop spinlocks into the sockets. There is a little lug and recess that makes sure the spinlock is in the right position. There is a cutout in the side of eack lock barrel where the securing bolt engages. Care needed to put the correct lock in each side. In my case no force at all was needed to get them to sit in place.
With the top still open, because you can see better, - loosen the bolt (use an 8mm ring spanner)securing the trim panel which covers the seat belt mechanism. It's underneath the inside of the panel at an angle. You will know whan it is loose enough as you can then lift the top part of plastic trim up. Dont undo it completely. The bolt remains attached to the panel.
Move the seats as far forward as possible and likewise move the seat backs well forward.
Remove the philips headed screw in the carpeted section of the panel. The screw is close to the rear bulkhead and quite low down. The panel will still be attached to the bodywork by two plastic clips which are part of the panel. If you lift the panel directly upwards it will come off. Remember to disconnect the plug for the screen heater on the left panel.
Close the top.
Fit the retaining bolt to a 5mm hex key - I used a straight key, an extension and a ratchet handle. I used clingfilm to wrap round the bolt and the key. It grips well and is pretty insubstantial so isnt a problem to remove.
Move the head lining (held in place by an elastic strap) to the side with your fingers and feel for the socket behind the main pivot of the top. Now you know where it is - offer the bolt up and start turning clockwise. In my case there was no problem either locating the sockets or getting the bolts to bite. It takes a lot of turning though before they become tight so don't lose heart. Tighten the bolts securely but dont overtighten. The clingfilm will tear when you remove the hex key.
Open top again and admire the fitted spinlocks. If it bothers you - remove the little bits of cling film that are left attached to the bolt heads. Refit the trim panels and ensure the rubber door seal is back where it belongs covering the edge of the trim. Seasy!
I've still to go and collect my hardtop so can't offer advice on adjusting - Yet!
|
|
|
|
 Posting Rules
|
You may not post new threads
You may not post replies
You may not post attachments
You may not edit your posts
HTML code is On
|
|
|
All times are GMT -8. The time now is 11:24 AM.
| |


 Linear Mode


