Go Back   986 Forum - The Community for Porsche Boxster & Cayman Owners > Porsche Boxster & Cayman Forums > DIY Project Guides

Post Reply
 
LinkBack Thread Tools Display Modes
Old 04-11-2017, 06:00 AM   #1
Registered User
 
Join Date: Apr 2009
Location: MD
Posts: 268
Garage
Refinishing BBS Sport Design Wheels with Duplicolor Spray Cans

I'm crossposting from "What did you do today with/to your Boxster"

Refinished my BBS Sport Design wheels with Duplicolor spray cans.

Partially refinished I should add, because the wheel centers were in OK condition, far better than the perimeters. These are two-piece BBS Sport Design wheels, all of which seem to suffer from corrosion in the finish on the perimeter of the rim. My sense is that this arises because the wheel centers do not perfectly seal on the rim (they don't need to actually) and let cleaning agents drip out over time long after you think that you've rinsed it all off, and proceed to eat up the finish. My belief is reinforced by the fact that the damage was not uniform and instead was localized. Moreover, on one occassion when a zealous detailer used some strong chemicals, the next morning I could see bubbling in the finish of all the wheels at the 6:00 position.

I know that the proper way to do these is to remove the 20 titanium bolts and take each wheel apart. This was more than I wanted to undertake, and I know that if you do this you run the risk of snapping off a bolt (they are set with Locktite), hopefully leaving enough of a stub to get a grip on them and still remove them. Instead I carefully hand sanded the perimters. Used 150 wet or dry sand paper followed by 220 and 400. I removed the wheels from the car as it would be kinder on my back.

The first picture is my wheels before this work. Classic failure mode on these wheels.
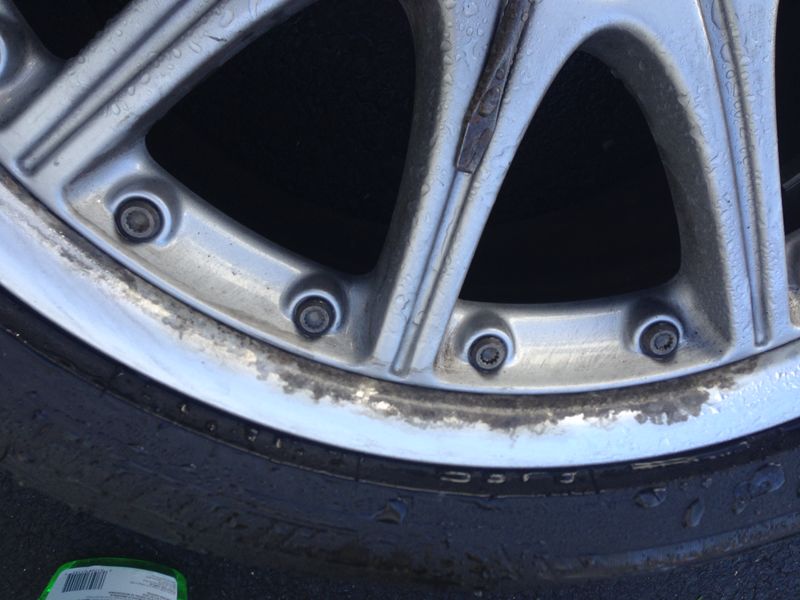


Here is what they looked like after sanding. My goal was to remove the visible corrosion completely and then abrade the remainder to provide a tooth for the new finish. Hopefully without damaging the finish on the centers as they were in OK shape.Since I was painting them silver I just needed the clear coat to be well adhered and not totally removed
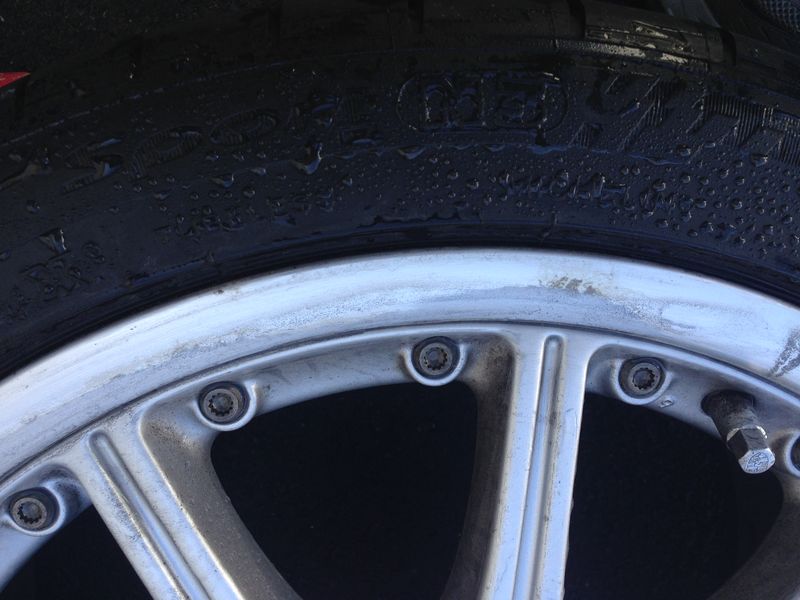


I know the wheel centers don't look that great in the "before" pics. They are just dirty and clean up quite well. See the "finished" picture before making a final judgement

After a thorough cleaning and allowing them to dry in the sun, I masked the wheels using index cards between the wheels and tire, blue painters tape between the two parts of the wheel (trimmed with a razor knife following the seam between the two parts of the wheel) and a damp folded towel over the centers.

Important: You remember how I talked of how cleaning solutions slowly leaked out throught the wheel seams? I used an aircompresser to blow the water out of that seam after letting the wheels dry in the sun. Without the air compresser this liquid would have continued to slowly dribble out onto the finish before it was fully cured. A high speed drive would not be enough to force the water out of the seams. The damage at the 6:00 position that I noted the morning after a detailer cleaned them had been after a 40 mile drive.

Finally the finished wheel perimeter. That was after 3 coats of Duplicolor self etching primer (DAP 1690), four coats of color (HWP101 Silver) and three coats of Matte Clear (HWP106)
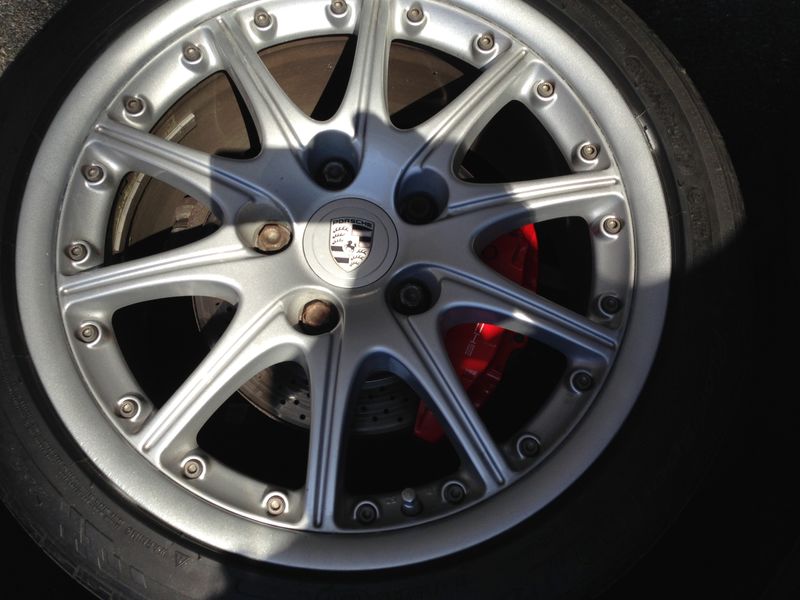


I did both wheels on one side working from noon to 7:00 PM. We'll see how they hold up over time, but for now I'm pleased. My expectations for this project were far exceeded. My initial goal was for them to be just "better." I would say that they are 90-95% - pleasantly surprised, both in the quality of my work and how well the Duplicolor matched the finish on the wheel centers.
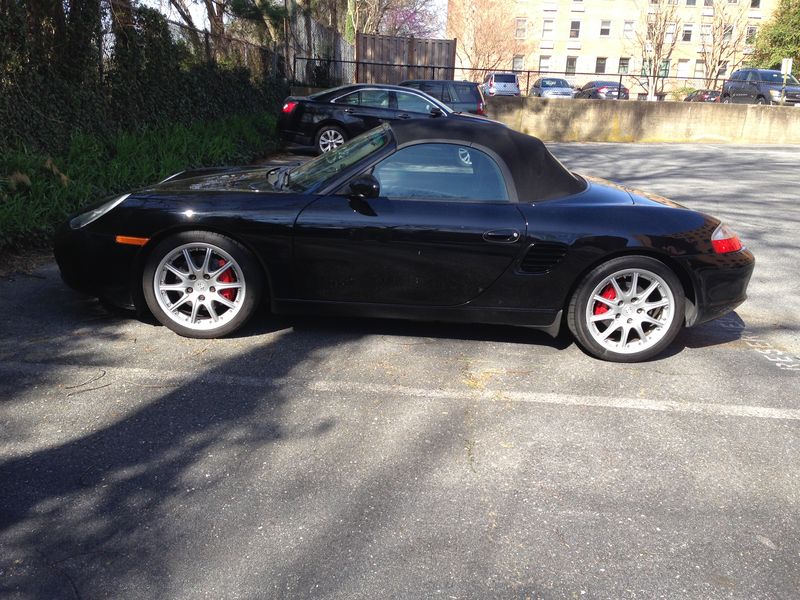


Two down two to go!


Last edited by Cbonilla; 04-18-2017 at 10:52 AM.
Cbonilla is offline   Reply With Quote
Old 04-11-2017, 10:34 AM   #2
Project Addicted
 
jcslocum's Avatar
 
Join Date: Aug 2015
Location: Eastern Shore, MD
Posts: 623
They look great!!!

What sandpaper grit did you use?

Are they hard to disassemble into 2 pieces so they could really be cleaned under the "lip"
__________________
______
Jon
1966 912, 1976 911
1986 944, 2000 Boxster
jcslocum is offline   Reply With Quote
Old 04-11-2017, 11:00 AM   #3
Registered User
 
Join Date: Apr 2009
Location: MD
Posts: 268
Garage
I started with 220 grit wet-or-dry paper, but it was slow going. I was able to find 150 and that helped a lot. Went over them after that with a quick pass with 220 and 400 grit before cleaning the wheels and letting them dry. Plus a little touch up on the road rash with a dremel. Then prime, paint and clear.

I initally thought I was going to bite the bullet and break the wheels apart, so this project got delayed while I pondered. I was dissuaded by the sheer number of titanium bolts to remove (80 on the set) and that the cleaning would be that much more involved -- no longer an afternoon with some sandpaper, but sending them out for media blasting. I decided that it would quickly grow from an afternoon of working on the car with friends to a week long process of removing them, getting the tires taken off, media balsted, refinished, etc. I decided that I wouldn't let the perfect be the enemy of the good and do it myself. So for $24 in spray cans I got a big improvement in appearance. I had one estimate of ~240 to powder coat the wheels (delivered to him with tires), but without breaking them apart. That was going to be an unknown extra.


Here is the write up that I referenced earlier, via Renntech.

https://www.renntech.org/forums/topic/24183-split-rim-wheel-refurbish-sport-design-style/

And then follow the link the a PDF.

Comprehensive. And he broke two of the bolts when removing the centers. He was lucky in that when they broke there was a stub long enough to grab on to and remove.

Last edited by Cbonilla; 04-11-2017 at 12:14 PM.
Cbonilla is offline   Reply With Quote
Old 05-24-2017, 11:30 AM   #4
Registered User
 
Join Date: Apr 2009
Location: MD
Posts: 268
Garage
Finally finished this job last weekend (after a false start) and got the other two wheels done. The false start was caused by the wheel lock key breaking as I tried to remove the wheels. I was able to sand them in place with the car jacked up, but impending rain and the difficulty in getting the index cards (used to mask the tires) to stay put when the wheels were in a vertical position put an end to that day's efforts. Ordered a new wheel lock key (again, the first one got lost) and paid another $40 to Porsche and had a shop with an impact gun drive the wheel locks off. And then promptly took off the wheel locks never to be used by me again. Replaced them (and a few others that were in bad shapte) with (used) lug bolts (with a light coating of antiseize per the manual).

All in all I think they look great, particularly for wheels on 14 year old car.

The verdict? Subject to how well the primed/painted/clear-coated lip holds up, not only was it a project worth doing, but I'm glad I didn't try and remove the 20 titanium bolts that hold each wheel together. Interestingly, the wheel in the worst shape had the most liquid trapped in the seam between the wheel halves, reinforcing my belief that cleaning solutions slowly oozing out onto the clear coat were a major part of the corrosion problem.

My advice for anyone breaking the wheels apart for a complete refinish:

1) Paint, and not just clear coat the barrels (which includes the lip). A polished surface just doesn't provide enough adhesion for the clear coat. A pure clear coat finish requires a smoother surface than one destined for paint. In my case most of the sanding was done with 150 grit, followed by quick passes with 220 and 400.

2) I would consider a fine bead of silicone at the seam between the wheels and the centers, after they're reassembled and painted. On both the inside of the wheel and the outside seams of the barrel with the centers. This would solve the problem of cleaning fluids seeping out over time and eating the finish. My caveat on this is that this may make it impossible to ever get the wheels apart again.

Last edited by Cbonilla; 05-30-2017 at 11:59 AM.
Cbonilla is offline   Reply With Quote
Old 05-31-2017, 01:29 AM   #5
Registered User
 
Join Date: Apr 2015
Location: SC
Posts: 33
Looks good. Did you apply adhesion promoter?
fredd5r is offline   Reply With Quote
Old 05-31-2017, 03:34 AM   #6
Registered User
 
Join Date: Apr 2009
Location: MD
Posts: 268
Garage
Not sure what an adhesion promoter is. I sanded to remove all the damaged clear coat and scuff up the surface, cleaned thoroughly, applied self-etching primer as the sanding removed a good bit of the clear coat which got me down to bare metal in places, color, and clear coat per duplicolor's instruction.

What's an adhesion promoter?

Edit: Googled and found adhesion promotors. Fancy term for primer, and may just be for painting plastics. Duplicolor describes theirs as "ideal for automotive plastics". Similar language for Rustoleum.

Last edited by Cbonilla; 05-31-2017 at 11:30 AM.
Cbonilla is offline   Reply With Quote
Old 08-30-2017, 07:38 AM   #7
Registered User
 
Join Date: Feb 2017
Location: Marlborough, UK
Posts: 15
Thanks for this. I have exactly the same issue on my car, and a wheel refurb is £100 per corner due to the bolts.
Rav 986S is offline   Reply With Quote
Old 08-31-2017, 05:46 AM   #8
Registered User
 
Join Date: Apr 2009
Location: MD
Posts: 268
Garage
Glad it helped. Mine have been done for a few months and they're holding up well

Last edited by Cbonilla; 08-31-2017 at 12:24 PM.
Cbonilla is offline   Reply With Quote
Old 08-31-2017, 03:35 PM   #9
Registered User
 
Join Date: Apr 2009
Location: MD
Posts: 268
Garage
And I can't stress enough the need to have access to for an air compressor to blow the water out of the seam. Without that, water will seep out on to fresh paint, possibly damaging it before it has fully hardened

CB
Cbonilla is offline   Reply With Quote
Old 09-01-2017, 03:32 AM   #10
Registered User
 
Join Date: Jun 2016
Location: England
Posts: 189
Looks great and a great job.

Trick now is to keep on top of them

They don't look like they will be easy to keep clean tho.
YellowS2000 is offline   Reply With Quote
Old 09-01-2017, 04:24 AM   #11
Registered User
 
Join Date: Apr 2009
Location: MD
Posts: 268
Garage
They have always been pain to keep clean. In fact I think it takes as long to clean the wheels as it does to wash the entire car

Next brake job I will give Akebono Ceramic pads a try. I'm hearing that they produce far less dust. Does anyone have experience with them?

Last edited by Cbonilla; 09-01-2017 at 12:02 PM.
Cbonilla is offline   Reply With Quote
Old 09-01-2017, 12:52 PM   #12
Registered User
 
Join Date: Apr 2009
Location: MD
Posts: 268
Garage
Just a note on Akebono brake pads for this car -- I believe part number EUR917 is the correct part for this 2003 986S. $100 from our sponsor Pelican. And $63 (shipped slowly) from that internet site that sells everything from A to Z
Cbonilla is offline   Reply With Quote
Old 11-21-2017, 04:42 PM   #13
Registered User
 
Join Date: Sep 2017
Location: MALIBU
Posts: 166
I have done 2 piece BBS wheels and I can't imagine not taking them apart before painting.

I just painted the 17" sport wheels on my 2003 Boxster today. I used "HOT ROD" black matte paint. Really looks great.

The trick is to prep them thoroughly. Clean all the dirt and grease with strong grease cutting detergent. Then use wax and grease remover to clean the surface. Sand with a 400 grit pad.

the HOT ROD paint I used was from a SEM kit from TCP Global. This kit has a Quart of paint, pint of catalyst, and a pint of reducer. I sprayed it with an HVLP spray gun.
__________________
2003Boxster
1973 Carreras RS tribute
2000 Saab Aero wagon stick
1990 Chevrolet pu pre runner
boxfix is offline   Reply With Quote
Old 11-29-2017, 11:19 AM   #14
Registered User
 
Join Date: Apr 2009
Location: MD
Posts: 268
Garage
Boxfix - did you have any issues with the bolts breaking when you took them off? I'd heard that was a real risk

CB

Cbonilla is offline   Reply With Quote
Post Reply


Thread Tools
Display Modes

Posting Rules
You may not post new threads
You may not post replies
You may not post attachments
You may not edit your posts

BB code is On
Smilies are On
[IMG] code is On
HTML code is On
Trackbacks are On
Pingbacks are On
Refbacks are On


All times are GMT -8. The time now is 04:22 AM.


Powered by vBulletin® Version 3.8.7
Copyright ©2000 - 2024, vBulletin Solutions, Inc.
Content Relevant URLs by vBSEO 3.6.0
Copyright 2024 Pelican Parts, LLC - Posts may be archived for display on the Pelican Parts Website -    DMCA Registered Agent Contact Page