
Replacing the rear suspension bracket aka 'side section bracket' or carrier.
I just replaced the right rear side section bracket on a 1999 Tiptronic. Mine had a chunk broken off where the bolt holds the toe adjustment. I have seen and heard of others that were cracked or warped. Here's the basics of how I did it. I did not follow any particular manual or instructions other than getting the torques from the Porsche 986 Shop Manual (updated through 2004).
Note: The structural integrity of the rear suspension is dependent on having all major parts attached. Once any structural parts have been removed, do not put weight on the wheels until it is fully reassembled.
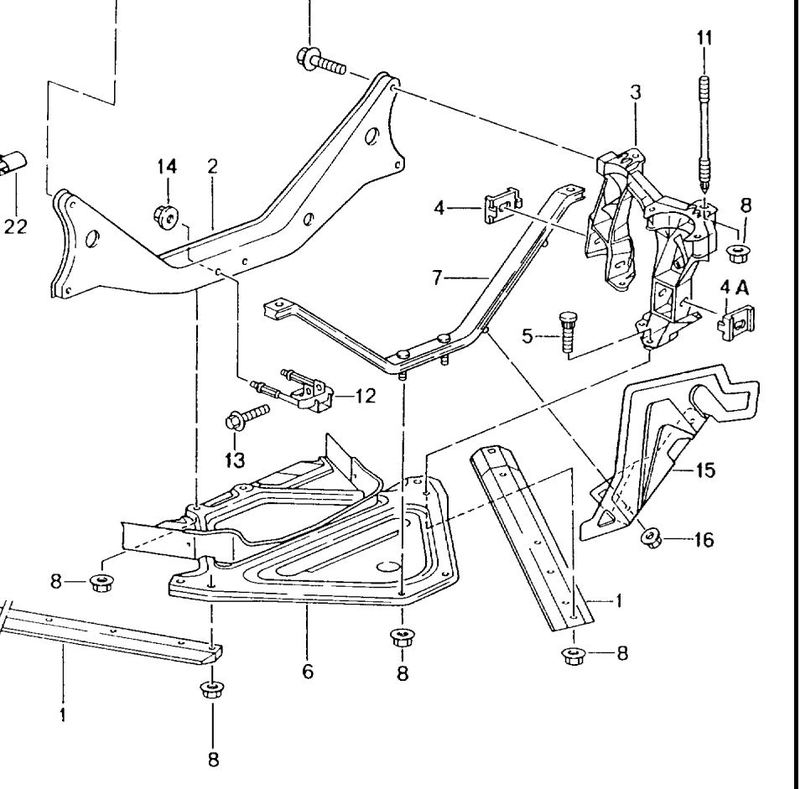
Fig 1.

Fig2.
1. Raise the car and support the car at the jack points.
2. Remove the wheel.
3. Remove both diagonal braces and the sheet metal brace. (Fig 2, 1 & 6)
4. Support the transmission with a transmission jack. (Use caution not to damage the transmission pan.)
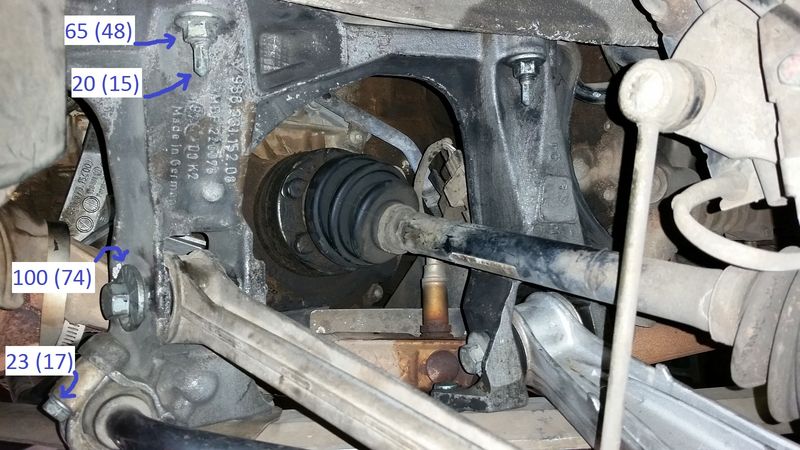
5. Remove the stabilizer bar brace from the rear of the side section bracket. (Not pictured 'C' shaped clamp that holds on the 'anti-sway bar')
6. Mark the rotational position, then remove the two eccentric bolts. (track and toe adjustment. Fig 1, 12 &18)
7. Remove the two bolts holding the transmission mount to the side section bracket. (Using a 13mm wrench to hold the bolt on top, it was easy to remove the nuts from beneath with a socket and long extension.)
8. *** I also replaced the transmission mount while I was there. Otherwise disregard this step.*** Remove the three bolts holding the transmission mount to the transmission. (I managed to do it without removing any of the exhaust system using a gear wrench and stubby 3/8 ratchet. You may want to, depending on your reach and tools available.)
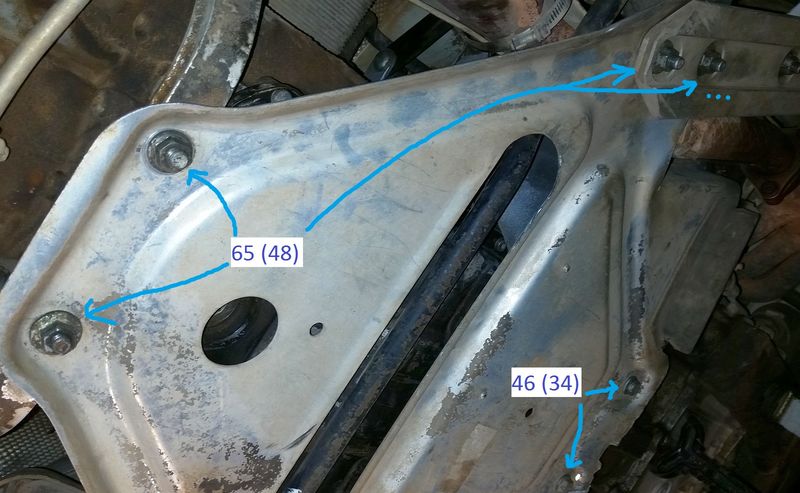
9. Remove the two bolts that hold the crossmember, fig. 2 (2), to the side section bracket.
10. Remove the nuts, and studs, fig. 2 (11), that attach the side section bracket to the body.
11. Remove the side section bracket. Mine came out easily by rotating it aft and down.
12. Reverse all these steps to install the replacement.
13. Torques Given in NM then (Feet):
1. Studs fig 2 (11) to body: 20 (15)
2. Side section bracket to body, nuts: 65 (48)
3. Crossmember to side section bracket: 65 (48)
4. Transmission mount to transmission: 65 (48) *may be different on manual and S
5. Transmission mount to side section bracket: 33 (24)
6. Eccentric bolts (track and toe adjustment): 100 (74)
7. Stabilizer bar to side section bracket: 23 (17)
8. Sheet metal brace and diagonal braces to side section bracket and rear V-bar (fig. 2, 7): 65 (48)
9. Sheet metal brace to crossmember: 46 (34)
10. Wheel lugs: 130 (96)


 Parts Car, car parts
 Honda Del Sol(s)
 "Hers"
 My Original '99
 The 78 F350
 This
This That
That The S 2.5
 Other
Other

 Linear Mode


