 02-11-2013, 08:07 PM
|
#1
|
|
Registered User
Join Date: Jul 2008
Location: Austin, TX
Posts: 124
|
Spec Boxster Wiring Harness clean-up?
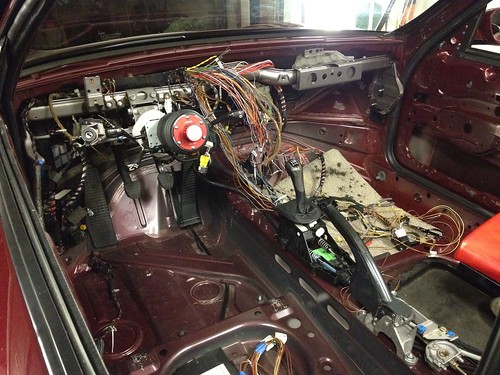
So as you can see from the pic I am at the fairly familiar stage in the spec build where it makes sense to take some time and remove the unnecessary wiring.
I have, like most people, a healthy fear of the damages I can cause by touching something I have no expertise over: electrical wiring. Of course that won't stop me from trying.

So before I just start cutting the excess wire and create a potential fire hazard, I figured I would ask if anyone had some advice on how to do it right.
I know to start the car regularly to verify that it is still operational, but what about the actual removal of the wires? do you trace it all the way to the relays? fuse box? can they be pulled cleanly or is there a need to cut and terminate?
Any help is appreciated.
Michael
|

|

|
|
02-12-2013, 06:35 PM
|
#2
|
|
Registered User
Join Date: Jul 2008
Location: Austin, TX
Posts: 124
|
50 views and not 1 piece of advice? I know it's not a sexy mod but I know the talent that resides on this forum should be able to offer some sort of insight!
__________________
Michael
http://imgur.com/aiZcIk8
|
|
|
|
|
02-12-2013, 08:52 PM
|
#3
|
|
Registered User
Join Date: May 2007
Location: California
Posts: 120
|
Not much to say on my end! About all I was brave enough to do was cut back all of the car stereo wires, because I knew they had neither power nor signal at that point.
I have heard that you can trace a given unused wire all the way back to the fuse or relay panel and ultimately pull the pin out there. You can also remove lots of unnecessary relays, depending on what accessories have been yanked out.
The ideal endgame includes moving the immobilizer box out from under the seat, along with the front fuse and relay panels, perhaps to the former passenger airbag dash location. Of course, that probably requires getting the whole harness out of the car first to unravel lots of wiring from the bundle. At a minimum, I'd recommend moving the immobilizer box as-is, off the floor, putting it in a plastic bag attached to the door bars of the cage, so it cannot get wet.
Here's a photo of my car during the interior tear-down, when it looked its worst!
 tedious work
 by bombaydigital, on Flickr
|
|
|
|
|
02-13-2013, 05:43 AM
|
#4
|
|
Registered User
Join Date: Jul 2008
Location: Austin, TX
Posts: 124
|
Thanks!
I actually came across that flicker series of pics while scouting the web desperately for more info.
From what I've read, once all unnecessary wires are gone, 4 remaining wires need to be extended in order to relocate the fuse and relay1 boxes to the old passenger airbag spot.
Good call on the immobilizer.
I started to go through the schematics in the Bentley and highlighted all the stuff I can pull out. I also found this video interesting for removing terminals from a connector:
removing terminals on the VW wiring harness - YouTube
It should be similar on the Boxster connector.
__________________
Michael
http://imgur.com/aiZcIk8
|
|
|
|
|
02-13-2013, 10:26 PM
|
#5
|
|
Registered User
Join Date: Aug 2004
Location: Alta Loma, CA
Posts: 1,334
|
Michael,
I start with all door wires, then stereo wires, then move to the HVAC wiring.
I end up with 4 fuses and one relay (fuel pump) at the front.
The biggest mistake I have made is accidentally removing a portion of the brake light wire. It splits off and goes two directions: ABS and brake lights.
Typically I pull 20+lbs out of the harness (depending on options the car shipped with)
The clutch safety switch can be grounded back at the ECU, so.. the wiring can go.
I'll have the TexasSpec site back up in a few days. Right now none of us can recall the admin password for the admin area.. LOL
__________________
Engine Builds, Transmission Builds, Engine Conversions, Suspension Installs, Suspension Tuning, Driver Coaching, Data Acquisition, Video, SCCA/PCA/POC/NASA/GRAND AM/ALMS.
We have worked with amateur and professional drivers for over 26 years. In house machinist, In house fabrication. Our cars, our parts, our engines, our transmission's run nationwide at events every weekend. We work side by side with industry names developing parts.
|
|
|
|
|
02-14-2013, 10:36 PM
|
#6
|
|
SPB racer
Join Date: Feb 2011
Location: San Antonio TX
Posts: 252
|
I successfully removed a full garbage bin full of wire and associated crap (about 30 lbs all up) by taking the following approach:
Start with wires that lead to nowhere because you have removed the thing that used to attach to them ie stereo, heater, airbags, AC, electric locks, windows etc. and simply remove the wrapping off the harness and trace the wire back to its source if you can (usually a switch, a fuse, the immobilizer or the big harness that runs back to the rear). If you can remove it all the way to the point of origin in one go great! If not, simply terminate and wrap the wire wherever you end up (it doesn't matter because you know it doesn't do anything and eventually you'll come back to it). Don't rewrap the harness yet. Instead simply place loose tie wraps around it every foot or so (that way the next wire you deal with can be more easily dealt with). Keep going until you have removed all the wires that terminated at nothing. It will take a lot of effort and a lot of patience but it's amazing how simple you can make the whole system in the end.
The next phase is to study the wiring diagrams and figure out what of the systems that are left you can live without or abbreviate - things like indicators, trip computers, wipers, lights, emmissions crap etc.
The only mistake I made in my process was to cut away a bunch of twisted pair wires that I assumed were speaker cables - turned out the Anti-lock brakes also use twisted pairs so I had to do a little rebuilding.
Not a job for the impatient but lots of fun.
Laurence.
|
|
|
|
|
02-14-2013, 11:03 PM
|
#7
|
|
Registered User
Join Date: Dec 2011
Location: Finland
Posts: 270
|
This is also on my long project list, so I will follow this discussion with interest 
__________________
Kroggers...
"Trying to drive a Boxster S for team CoolCava Racing!"
www.coolcavaracing.com | www.paulkrogdahl.com
|
|
|
|
|
02-15-2013, 10:10 AM
|
#8
|
|
Registered User
Join Date: Dec 2012
Location: DE
Posts: 126
|
A related suggestion - while you have everything apart, it would be a good time to consider wiring for the things you will be adding to the car. Things such as a transponder, cool suit, trans cooler pump, etc. It will be easier and cleaner to add those now and incorporate them into the revised harness.
|
|
|
|
|
02-15-2013, 11:43 AM
|
#9
|
|
Registered User
Join Date: Aug 2004
Location: Alta Loma, CA
Posts: 1,334
|
When I'm done, I'm using a black split loom mesh in 3 sizes.
3M sells a cloth tape that is nearly dead on (it's a few mm's wider) and can be bought at Home Depot!!
The later 9X7's gave me the idea for the mesh loom cover. They use it throughout the car. I buy it from a company close to the shop called "Orvac".
I wrap the mesh cover every 6-8 inches with one wrap (don't pull it tight) the mesh cover is made to wrap around the wires (think spring loaded)
__________________
Engine Builds, Transmission Builds, Engine Conversions, Suspension Installs, Suspension Tuning, Driver Coaching, Data Acquisition, Video, SCCA/PCA/POC/NASA/GRAND AM/ALMS.
We have worked with amateur and professional drivers for over 26 years. In house machinist, In house fabrication. Our cars, our parts, our engines, our transmission's run nationwide at events every weekend. We work side by side with industry names developing parts.
|
|
|
|
|
02-15-2013, 11:58 AM
|
#10
|
|
Registered User
Join Date: Aug 2004
Location: Alta Loma, CA
Posts: 1,334
|
This picture wasn't taken to show the harness, but you can see what I end up with. This was a BoxsterS not a 2.5 car.

__________________
Engine Builds, Transmission Builds, Engine Conversions, Suspension Installs, Suspension Tuning, Driver Coaching, Data Acquisition, Video, SCCA/PCA/POC/NASA/GRAND AM/ALMS.
We have worked with amateur and professional drivers for over 26 years. In house machinist, In house fabrication. Our cars, our parts, our engines, our transmission's run nationwide at events every weekend. We work side by side with industry names developing parts.
|
|
|
|
|
02-15-2013, 12:00 PM
|
#11
|
|
Registered User
Join Date: Aug 2004
Location: Alta Loma, CA
Posts: 1,334
|
I still hate this site.. cant upload pictures.. LAME.
__________________
Engine Builds, Transmission Builds, Engine Conversions, Suspension Installs, Suspension Tuning, Driver Coaching, Data Acquisition, Video, SCCA/PCA/POC/NASA/GRAND AM/ALMS.
We have worked with amateur and professional drivers for over 26 years. In house machinist, In house fabrication. Our cars, our parts, our engines, our transmission's run nationwide at events every weekend. We work side by side with industry names developing parts.
|
|
|
|
|
02-16-2013, 05:22 PM
|
#12
|
|
Registered User
Join Date: Jul 2008
Location: Austin, TX
Posts: 124
|
Guys,
Thank you so much for all the feed-back!
Got a couple of very welcomed PMs with additional information, thanks for these as well.
Just ordered a bunch of parts (S oil cooler, 3rd radiator kit, low temp thermostat, new water pump, 3qts accusump to replace the seizing one...). This means that I have 1 week to get through the wiring fun before I get compelled to switch to the new shiny stuff!
So Brad, 4 Fuses and 1 relay seems extreme! looking at the diagrams I listed everything that seemed safe to pull but several relays appear to have dual function. Is that result achieved just by attrition or do you re-route some to the 2nd relay panel in the rear?
__________________
Michael
http://imgur.com/aiZcIk8
|
|
|
|
|
02-16-2013, 05:24 PM
|
#13
|
|
Registered User
Join Date: Jul 2008
Location: Austin, TX
Posts: 124
|
Quote:
Originally Posted by Brad Roberts

I still hate this site.. cant upload pictures.. LAME.
|
Sounds bad... you mean you love the community but feel the tool could be improved?
Have you tried "Password123" for an admin pw? 
__________________
Michael
http://imgur.com/aiZcIk8
|
|
|
|
|
02-17-2013, 05:19 AM
|
#14
|
|
SPB racer
Join Date: Feb 2011
Location: San Antonio TX
Posts: 252
|
I ended up with 3 relays. Fuel pump up front and 2 engine system relays at rear.
I also have a few more fuses than Brad. 1 each for wipers, lights (not really needed), brake lights, fuel pump, unswitched power and switched power - 6 total. I then added 4 that for accessories - cameras, Coolsuit, transponder and my face level blower fan. In my case a new fuse box is located on the end of the dashboard so that it is easily accessible and the original is gone along with the relay box.
|
|
|
|
|
02-17-2013, 06:17 AM
|
#15
|
|
Registered User
Join Date: Jul 2008
Location: Austin, TX
Posts: 124
|
Quote:
Originally Posted by Jittsl
I ended up with 3 relays. Fuel pump up front and 2 engine system relays at rear.
I also have a few more fuses than Brad. 1 each for wipers, lights (not really needed), brake lights, fuel pump, unswitched power and switched power - 6 total. I then added 4 that for accessories - cameras, Coolsuit, transponder and my face level blower fan. In my case a new fuse box is located on the end of the dashboard so that it is easily accessible and the original is gone along with the relay box.
|
Sounds closer to what I expect to see when I am done.
The new fuse box you mention, did you go the painlesswiring.com route?
__________________
Michael
http://imgur.com/aiZcIk8
|
|
|
|
|
02-17-2013, 07:24 AM
|
#16
|
|
SPB racer
Join Date: Feb 2011
Location: San Antonio TX
Posts: 252
|
No. I just bought 2 inexpensive universal fuse boxes (the sort with a single input connection and 6 fuses with spade outputs) on ebay. I then wired one as switched from the ignition key and one as unswitched from the distribution box and then utilized as appropriate for the purpose. Switched fuses go to 1.Engine (DME etc.) & ABS, 2. Fuel pump, 3. wipers, 4. lights, 5. brake lights and 6. transponder. Unswitched to 1. engine, 2. inside fan, 3. Coolsuit and 4. cameras. 5&6 are spare
If I had a clue how to post a photo I would do so but alas I am clueless when it comes to these new fanged technologies.
Laurie
|
|
|
|
|
02-17-2013, 06:15 PM
|
#17
|
|
Registered User
Join Date: Jul 2008
Location: Austin, TX
Posts: 124
|
Quote:
Originally Posted by Jittsl
...If I had a clue how to post a photo I would do so but alas I am clueless when it comes to these new fanged technologies.
Laurie
|
when preparing your response you should see a "attach a Photo" option below the text box. It allows you to upload a pic providing that it is no bigger than 2MB.
The other option is to upload a pic to a 3rd party pic site like imgur: the simple image sharer and just share the link to the pic. imgur actually offers the right code to embed in whatever interface you are using.
__________________
Michael
http://imgur.com/aiZcIk8
|
|
|
|
|
02-18-2013, 11:16 AM
|
#18
|
|
SPB racer
Join Date: Feb 2011
Location: San Antonio TX
Posts: 252
|
Michael, I just realized that you are in Austin. I'm in San Antonio. You are welcome to drop by any time and have a look at what I have done. Email me on Laurence.jitts@att.net if you would like to do so.
Laurie
|
|
|
|
|
02-18-2013, 04:59 PM
|
#19
|
|
Registered User
Join Date: Aug 2004
Location: Alta Loma, CA
Posts: 1,334
|
I set the wipers up so they are removable in 5min. Quick disconnect at the motor. The relay/wiring stay with the actual assembly. It leaves me with one speed.. but experience has shown me there is no need for 2-3 speeds. I wire the *fast* speed to a toggle switch on the center face plate.
One relay "at the front" for the fuel pump. Still need the rear relays (as Jitts pointed out)
I don't have a lot of people out here running cool suits and the such (we don't see the heat)
I wire the transponders off the heater wire for the windshield washer bottle (it's key on) *Some* of my customers ask to have the transponder on a switch..
__________________
Engine Builds, Transmission Builds, Engine Conversions, Suspension Installs, Suspension Tuning, Driver Coaching, Data Acquisition, Video, SCCA/PCA/POC/NASA/GRAND AM/ALMS.
We have worked with amateur and professional drivers for over 26 years. In house machinist, In house fabrication. Our cars, our parts, our engines, our transmission's run nationwide at events every weekend. We work side by side with industry names developing parts.
|
|
|
|
|
02-18-2013, 05:40 PM
|
#20
|
|
SPB racer
Join Date: Feb 2011
Location: San Antonio TX
Posts: 252
|
Likewise the wiper in my car (I've only got one - I cut he passenger side off). Single toggle switch / single speed / single wiper/ no relay. Due to carefully placed hole in plastic shroud (to allow access to one of the two bolts securing the motor assembly) the wiper and motor are in or out in a few minutes. Similarly my lights are toggle switch / high beam only / no relay. Both have a new harness made up for them. Simply - switched fuse box - toggle switch - wiper motor (or lights including tail lights) - earth. The stalks are long gone.
|
|
|
|
 Posting Rules
|
You may not post new threads
You may not post replies
You may not post attachments
You may not edit your posts
HTML code is On
|
|
|
All times are GMT -8. The time now is 03:02 AM.
| |


 Linear Mode


