 07-29-2018, 04:47 PM
|
#1
|
|
Registered User
Join Date: Jun 2018
Location: Charlotte, NC
Posts: 14
|
986 seat bottom repair band
So today i went out in the 04 Boxster and heard (and felt) a pop under the seat. I then felt and heard a second pop. I noticed when I got ihad t to f the car that the seat bottom cushion did not return to text normal position. It was sagging.
I took the seat out and it doesnt look like the diagrams I have seen online. It has a kind of band from front to back with a rubber piece that I assume carries the weight of the cushion. That has snapped. Has anyone wv r had to repair this?
|

|

|
|
07-29-2018, 05:09 PM
|
#2
|
|
Registered User
Join Date: Jun 2018
Location: Charlotte, NC
Posts: 14
|
|
|
|
|
|
07-30-2018, 01:50 AM
|
#3
|
|
Registered User
Join Date: Jul 2013
Location: Bastrop, Tx
Posts: 2,644
|
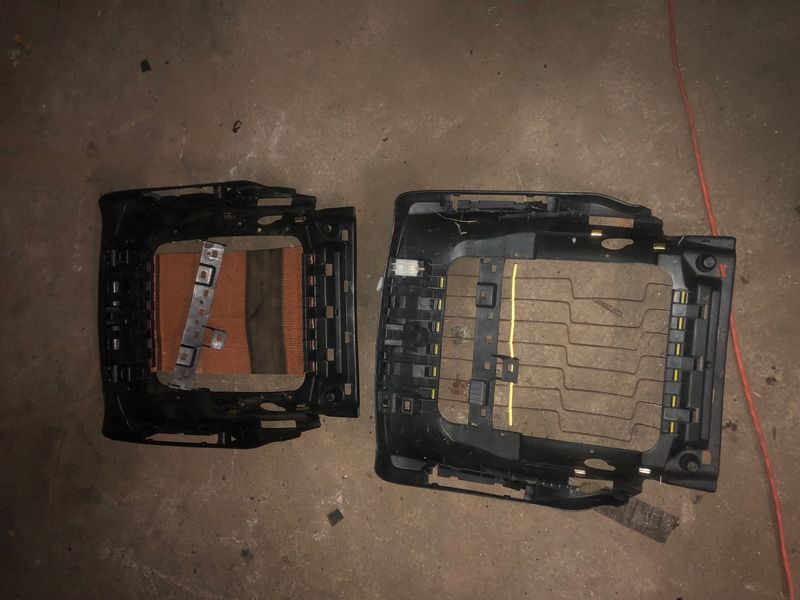
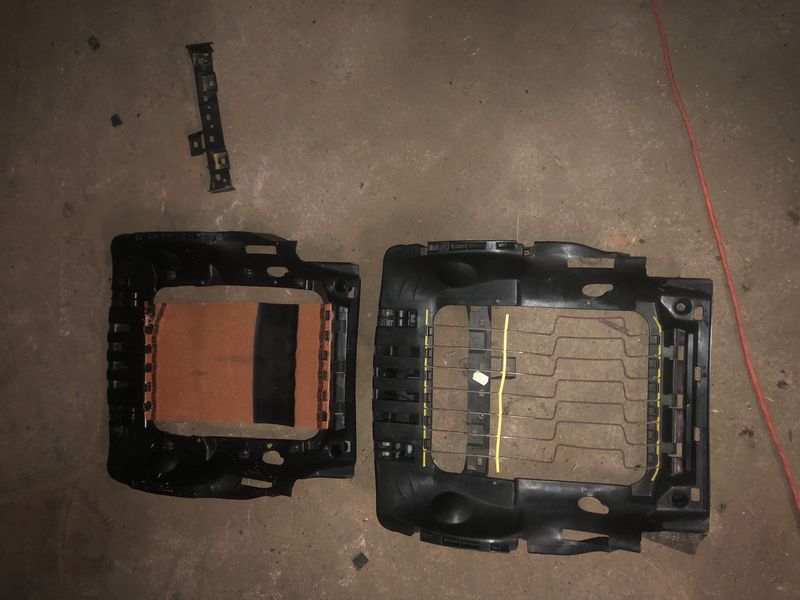
1997-2000 have a much more durable metal spring setup. 2001-04 have a plastic mesh spring. The 01-04 mesh or the plastic frame will eventually break. It's easy to retrofit the earlier frame and springs into your 04 seat cushion
__________________
Woody
|
|
|
|
|
07-30-2018, 01:52 AM
|
#4
|
|
Registered User
Join Date: Jul 2013
Location: Bastrop, Tx
Posts: 2,644
|
__________________
Woody
|
|
|
|
|
07-30-2018, 06:46 AM
|
#5
|
|
Registered User
Join Date: Jun 2018
Location: Charlotte, NC
Posts: 14
|
Quote:
Originally Posted by itsnotanova

|
THanks Woody. I actually found a write up on another site with the part number from the band ( it is 99652150702, btw) which is called an "Absorber Mat". I already ordered one on ebay so I will try the swap out and, if that doesn't work, my fallback will be to replace the bottom completely.
|
|
|
|
|
07-30-2018, 09:13 PM
|
#6
|
|
Motorist & Coffee Drinker
Join Date: Jul 2014
Location: Oklahoma
Posts: 3,953
|
__________________
I am not an attorney, mechanic, or member of the clergy. Following any advice given in my posts is done at your own peril.
|
|
|
|
|
08-02-2018, 09:44 AM
|
#7
|
|
Registered User
Join Date: Jun 2018
Location: Charlotte, NC
Posts: 14
|
Quote:
Originally Posted by 78F350
|
I actually tried that...it lasted about 10 minutes. The rubber part of thof band as just too dried out.
The good news is I found a replacement band on eBay for about $45. The bad news is when I got it I realize the ends of it or frayed even more than my original band from 2004. I then found out you have to pretty much disassemble the entire bottom of the seat to get the band swapped out. I did eventually get it swapped out but after sitting in it the first time as a test and looking under again I see that the foam is still pushing out of the plastic frame. The band is in place but whatever kept the foam inside the frame has weakened to the point where all of my weight is riding on that band.
It looks like I might have to find an older frame.
|
|
|
|
|
08-02-2018, 12:52 PM
|
#8
|
|
Motorist & Coffee Drinker
Join Date: Jul 2014
Location: Oklahoma
Posts: 3,953
|
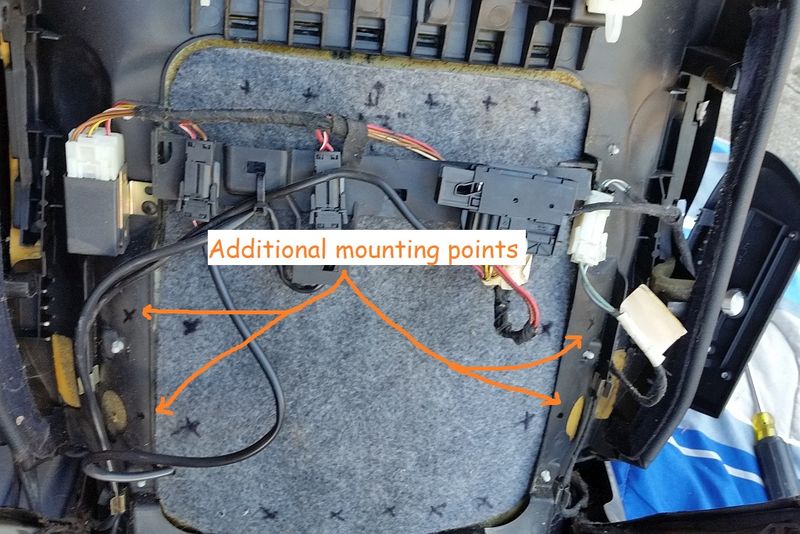
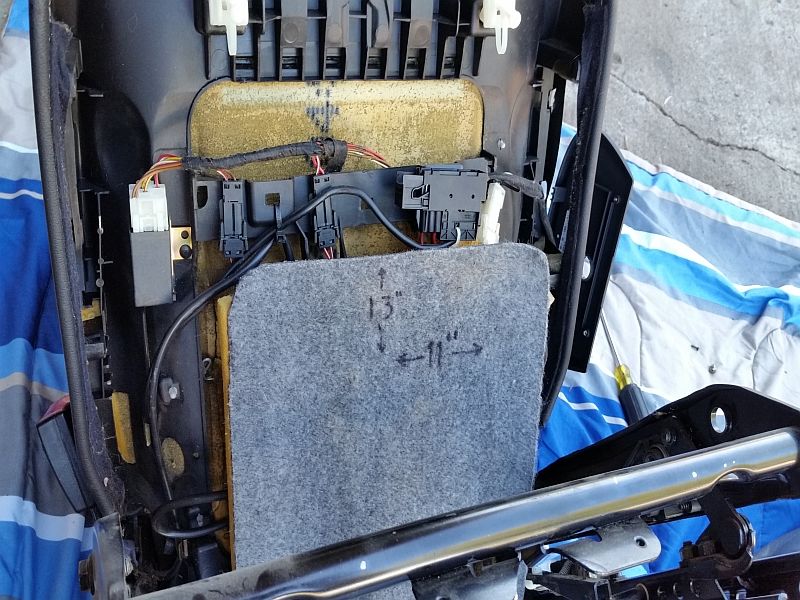
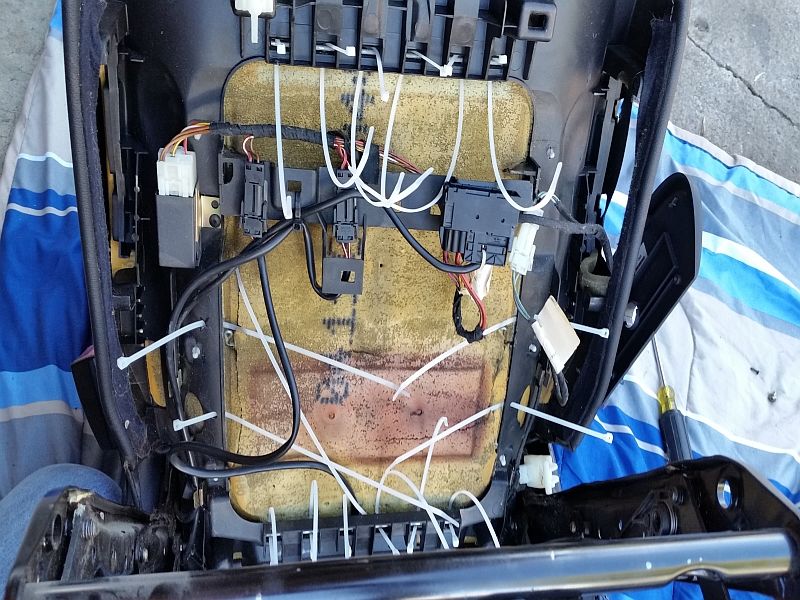
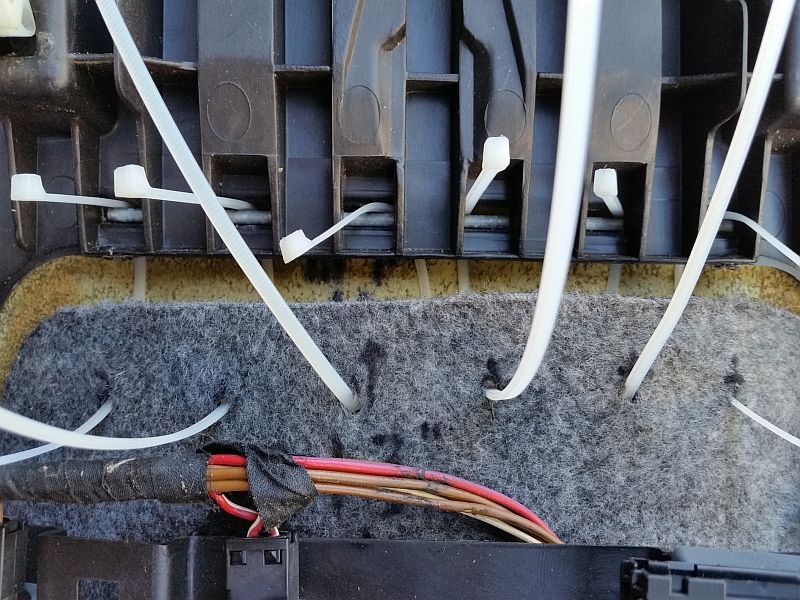
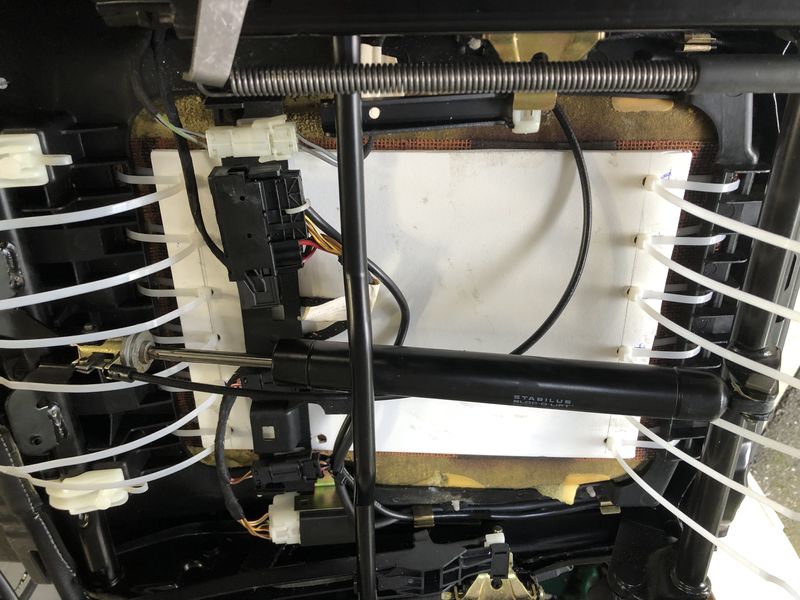
My pictures may be hard to completely follow along without a description. I did not attempt to repair the band; I completely replaced it.
1. remove the old band completely.
2. Cut a heavy material to replace the band. I used a scrap of trunk liner (grab one for a couple $ at a junk yard if you don't have a suitable material) cut to about 11 x 13 inches.
3. Insert heavy duty zip-ties in all of the attachment points (around the metal rod).
4. Line up the material with the seat frame, mark then drill holes for the zip ties to secure it.
5. Put the material in place, insert zip-ties and tighten.
***note: I did add two additional holes for zip ties on the left and right side of the plastic frame.
Mine has held up well for 2 years and is a little more firm than the original.
I could send you a seat base from a '99 if Woody doesn't have one available. Good, but looks like partial cracking in the leather along the stitching in one part.
Here's pics of the one I will sell: https://www.flickr.com/photos/126478035@N08/shares/768jf7
__________________
I am not an attorney, mechanic, or member of the clergy. Following any advice given in my posts is done at your own peril.
Last edited by 78F350; 08-02-2018 at 01:09 PM.
|
|
|
|
|
11-12-2018, 06:18 PM
|
#9
|
|
Registered User
Join Date: Nov 2018
Location: Central valley
Posts: 22
|
Thanks for the great tips. The driver seat in my 2003 boxster has the same issue. Where did you source the heavy material? Any hints would be helpful.
Quote:
Originally Posted by 78F350
My pictures may be hard to completely follow along without a description. I did not attempt to repair the band; I completely replaced it.
1. remove the old band completely.
2. Cut a heavy material to replace the band. I used a scrap of trunk liner (grab one for a couple $ at a junk yard if you don't have a suitable material) cut to about 11 x 13 inches.
3. Insert heavy duty zip-ties in all of the attachment points (around the metal rod).
4. Line up the material with the seat frame, mark then drill holes for the zip ties to secure it.
5. Put the material in place, insert zip-ties and tighten.
***note: I did add two additional holes for zip ties on the left and right side of the plastic frame.
Mine has held up well for 2 years and is a little more firm than the original.
I could send you a seat base from a '99 if Woody doesn't have one available. Good, but looks like partial cracking in the leather along the stitching in one part.
Here's pics of the one I will sell: https://www.flickr.com/photos/126478035@N08/shares/768jf7 |
|
|
|
|
|
11-12-2018, 06:29 PM
|
#10
|
|
Registered User
Join Date: Nov 2018
Location: Central valley
Posts: 22
|
Thanks for the great tips. The driver seat in my 2003 boxster has the same issue. Where did you source the heavy material? Any hints would be helpful.
Quote:
Originally Posted by 78F350
My pictures may be hard to completely follow along without a description. I did not attempt to repair the band; I completely replaced it.
1. remove the old band completely.
2. Cut a heavy material to replace the band. I used a scrap of trunk liner (grab one for a couple $ at a junk yard if you don't have a suitable material) cut to about 11 x 13 inches.
3. Insert heavy duty zip-ties in all of the attachment points (around the metal rod).
4. Line up the material with the seat frame, mark then drill holes for the zip ties to secure it.
5. Put the material in place, insert zip-ties and tighten.
***note: I did add two additional holes for zip ties on the left and right side of the plastic frame.
Mine has held up well for 2 years and is a little more firm than the original.
I could send you a seat base from a '99 if Woody doesn't have one available. Good, but looks like partial cracking in the leather along the stitching in one part.
Here's pics of the one I will sell: https://www.flickr.com/photos/126478035@N08/shares/768jf7 |
|
|
|
|
|
11-12-2018, 06:35 PM
|
#11
|
|
Registered User
Join Date: Nov 2018
Location: Central valley
Posts: 22
|
Quote:
Originally Posted by 78F350
My pictures may be hard to completely follow along without a description. I did not attempt to repair the band; I completely replaced it.
1. remove the old band completely.
2. Cut a heavy material to replace the band. I used a scrap of trunk liner (grab one for a couple $ at a junk yard if you don't have a suitable material) cut to about 11 x 13 inches.
3. Insert heavy duty zip-ties in all of the attachment points (around the metal rod).
4. Line up the material with the seat frame, mark then drill holes for the zip ties to secure it.
5. Put the material in place, insert zip-ties and tighten.
***note: I did add two additional holes for zip ties on the left and right side of the plastic frame.
Mine has held up well for 2 years and is a little more firm than the original.
I could send you a seat base from a '99 if Woody doesn't have one available. Good, but looks like partial cracking in the leather along the stitching in one part.
Here's pics of the one I will sell: https://www.flickr.com/photos/126478035@N08/shares/768jf7 |
Do you still have it for sale?
|
|
|
|
|
11-07-2021, 02:56 PM
|
#12
|
|
Registered User
Join Date: Jan 2014
Location: New Jersey
Posts: 1,631
|
Did my driver seat today
__________________
Current: 2022 718 Cayman GT4, PDK bone stock (the dark side).
Former: 2003 S, 3.6 LN Nickies, ARP rod bolts, under-drive pulley, Fabspeed sport headers, Softronic tune, 987 airbox 987 motor mount, Function-First Sport motor mount insert, Ben's short shifter, Nine8Six projector headlights & center caps, ROW M030, stainless flexible brake lines, B-K rollbar extension & fire extinguisher mount, hardtop
|
|
|
|
|
11-11-2021, 02:25 PM
|
#13
|
|
2003 Base 5-speed
Join Date: Jul 2015
Location: Stoneham, MA
Posts: 949
|
I DIYd the bottom webbing of the drivers seat in my 03. Used anything I could find laying around, but basically a sheet of plexiglass with thin foam held in place by para-cord. Looked a mess, but actually worked pretty well. However, I later decided to get the seats professionally reupholstered with new foam and skins. The installer had a nice solution for the sagging bottom - heavy duty canvas, stretched pretty tightly. Been good for about 2 years.

Sent from my iPad using Tapatalk
|
|
|
|
|
11-26-2022, 10:31 PM
|
#14
|
|
Registered User
Join Date: Jan 2022
Location: Burbank, CA
Posts: 2
|
Torn seat bottom mesh zip tie fix
I ran into the same issue as others have, that sinking feeling and the feel of ripped material under the bottom of the seat. I decided that since the time is also coming where Ill need new leather covers, but not now, to perform a support and zip tie operation. I cut an plastic lawn sign it to fit under the seat foam and secured it as others have with zip ties. I added a few side support points. Feeling certain that both my 200 lbs weight and my driving style would cause those zip ties to pull through the plastic sign, I decided to weave zip ties across the bottom of the plastic support piece in a zip tie webbing fashion. It should hold up for a while. Also, no need to disconnect the battery to avoid an air bag warning light. Just take the key out of the ignition before you disconnect the wiring harness under the seat. That can be easily accomplished by using a 6 piece of 2x4 lumber to prop up the seat (after unbolting) twisting the connector counter-clockwise 45 degrees to detach from the frame and on the passenger side of the connector, pulling a clip on the connector in the direction of the passenger side of the car thus freeing the plug which then easily pulls out. 
|
|
|
|
|
11-27-2022, 07:32 AM
|
#15
|
|
Registered User
Join Date: Mar 2020
Location: Phoenix
Posts: 120
|
My 03 manual seat is stuck in the raised position with the hydraulic cylinder extended as as in the photos.
Ive tried everything except taking it out. Afraid Ill wreck the bottom like this if I thrash any harder.
Any idea how to lower?
|
|
|
|
 Posting Rules
|
You may not post new threads
You may not post replies
You may not post attachments
You may not edit your posts
HTML code is On
|
|
|
All times are GMT -8. The time now is 10:34 AM.
| |


 Parts Car, car parts
 Honda Del Sol(s)
 "Hers"
 My Original '99
 The 78 F350
 This
This That
That The S 2.5
 Other
Other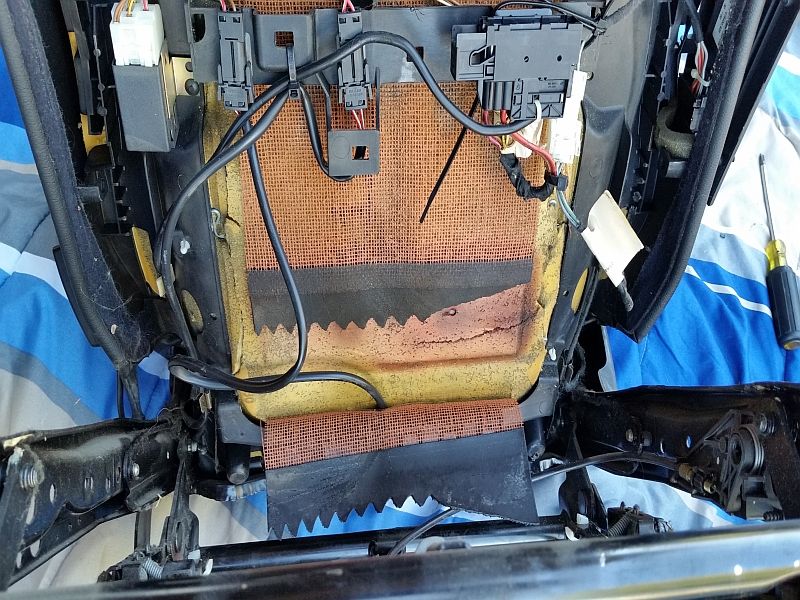


 Blue Box
 Linear Mode


