Go Back   986 Forum - The Community for Porsche Boxster & Cayman Owners > Porsche Boxster & Cayman Forums > Boxster General Discussions

Post Reply
 
LinkBack Thread Tools Display Modes
Old 07-03-2016, 06:41 PM   #1
Registered User
 
husker boxster's Avatar
 
Join Date: Sep 2006
Location: Omaha
Posts: 2,865
987 Boxster convertible top sides not tucked in

Disclaimer 1: Not sure if 986s have this issue, but it's prevalent with 987s.

Disclaimer 2: I did not come up with this idea. Rrunkle on Planet 9 did but I've added some detail and updates to it. Since I did not find a thread on this topic on 986forum, thought I'd pass it along to the membership. Plus I've swiped a cpl pics that I didn't take but need to assist with this thread.

The Problem: In Porsche's infinite wisdom, they use strings and elastic bands to keep their convertible tops in the proper position. Not good from a longevity stand point as both stretch over time and cause issues. When the elastic band stretches, it allows the canvas to go over the outside of the top bow, putting a lot of strain on the stitching holding the beading edge of the canvas roof. And once the canvas goes over the outside of the bow, the elastic band is stretched further and it will always go on the outside.

Make shift solutions: Stop the process of putting the top up just past service mode and get out and guide the top over both bows. Or you and the significant other reach back while the top is going up and guide the canvas inside the bow. Or I've heard you can push the top of the back window up and out which tucks the sides in enough to go inside of the bows. This doesn't work well if you have a windstop.

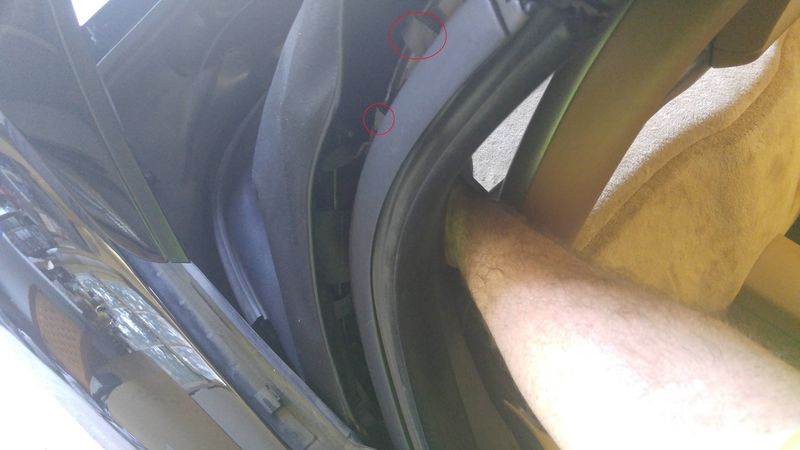
Solution 1: The elastic band has slots in it which allow you to tighten up the band. It requires a torx 15 socket. The first step is to release 2 Velcro straps that keep the headliner on the framework. This allows you to get inside the top. See the circles for the Velcro locations.


The elastic band torx screw is about 8" into the bowels of the top.


IMPORTANT: before removing the screw, put a towel into the compartment so if you drop the screw it doesn't fall into oblivion. Be sure the towel goes all the way out the window (you might get the screw out but drop it before you get it completely out - voice of experience). And don't forget to pull the towel out after you're finished.

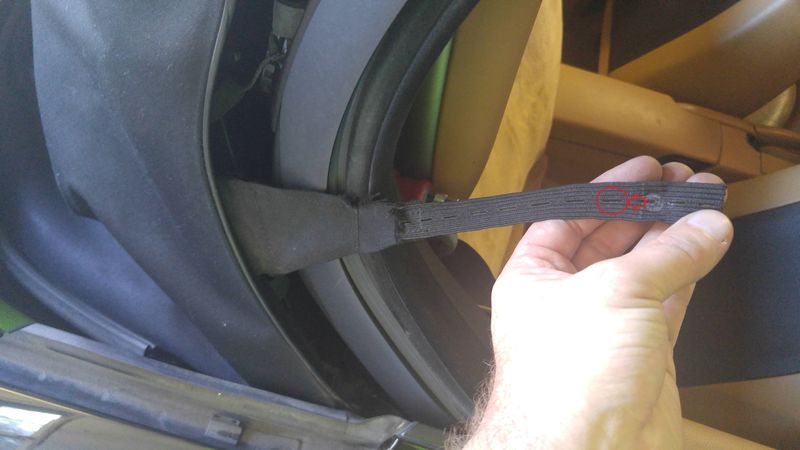
Once you have the screw removed, the strap w/ elastic band looks like this.


Try moving the screw into a closer slot (like the arrow points to in the above pic).

HOWEVER, it is important not to make the band too tight as it will snap if there's too much tension on it. The problem is that band becomes less elastic as it ages and stretches, so you may find yourself between slots (too loose doesn't fix the problem, too tight breaks the band). What to do then?

Solution 2: Connect some bungee chord (aka shock chord) to the strap and use it instead of the elastic band. Here are the steps to perform this solution.

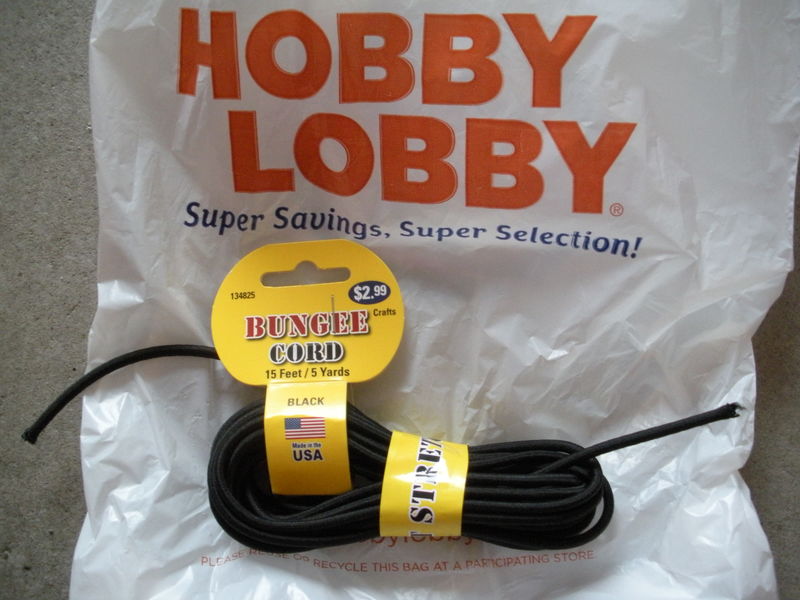
A. Buy some bungee chord at a local hobby store. I got mine at Hobby Lobby.


B. Cut a 12" section and burn the edges to prevent fraying.


C. Fish the looped chord thru the strap with a thin wire.


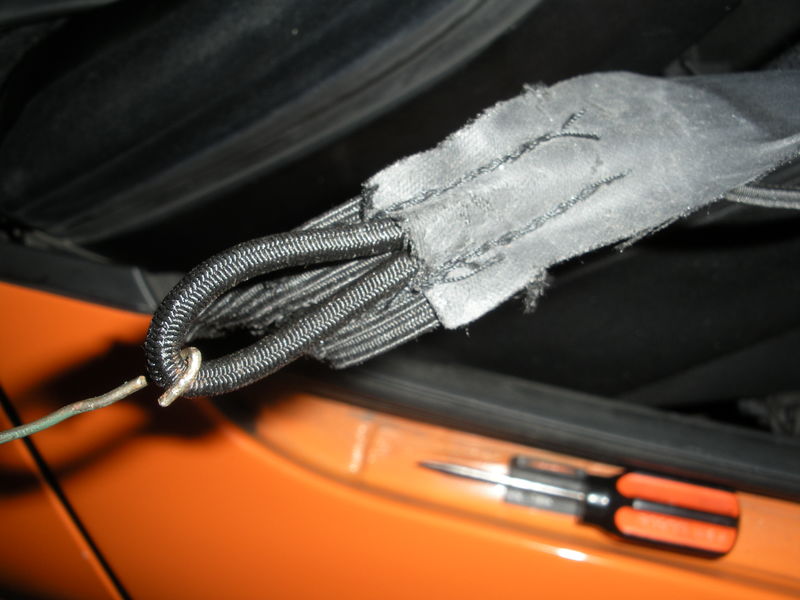
D. Measure 4 1/2" from the gray strap to the end of the loop. My measurement was with the loop pinched at the end (it's not pinched in the pic).
UPDATE: I've had better luck with 4 1/4".


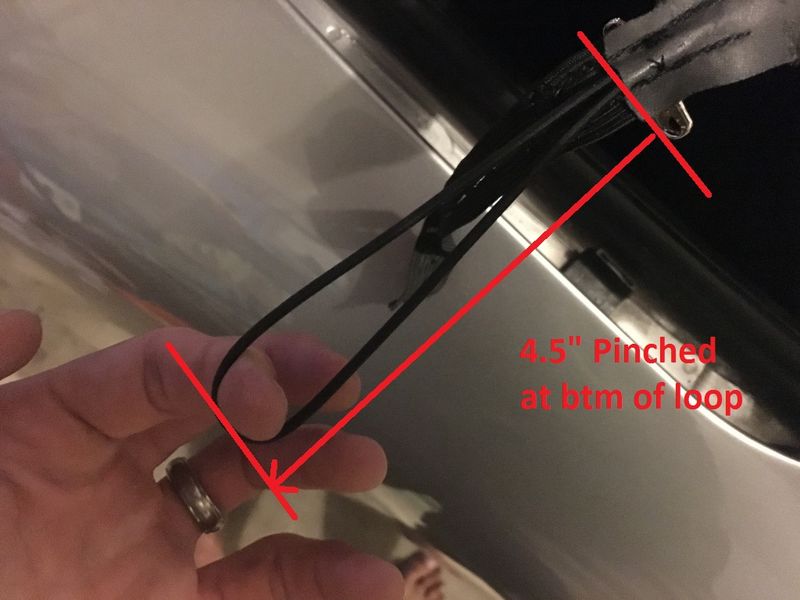
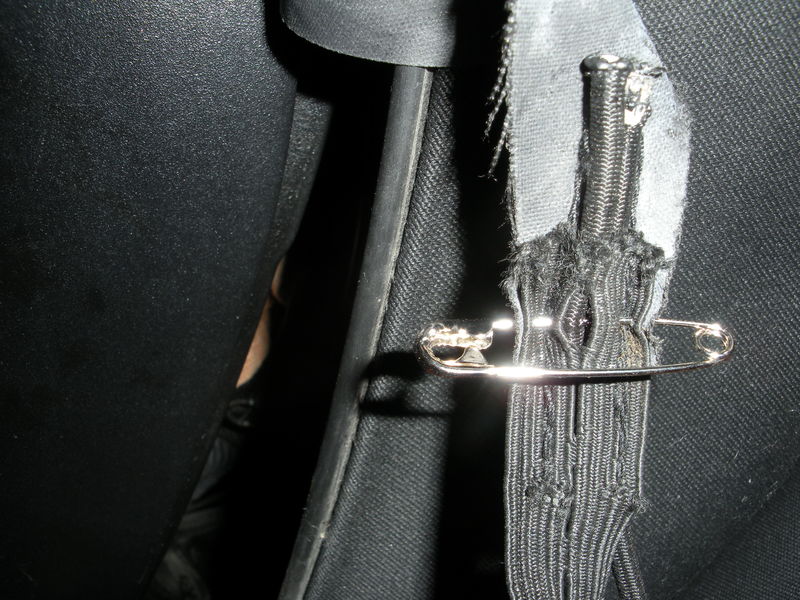
Take a safety pin and pierce the strap, both pieces of chord, and the other side of the strap. Put the pin on the elastic band side of the strap since that's the side of the strap that's away from the canvas top. It may take a couple of attempts to get everything pinned properly.


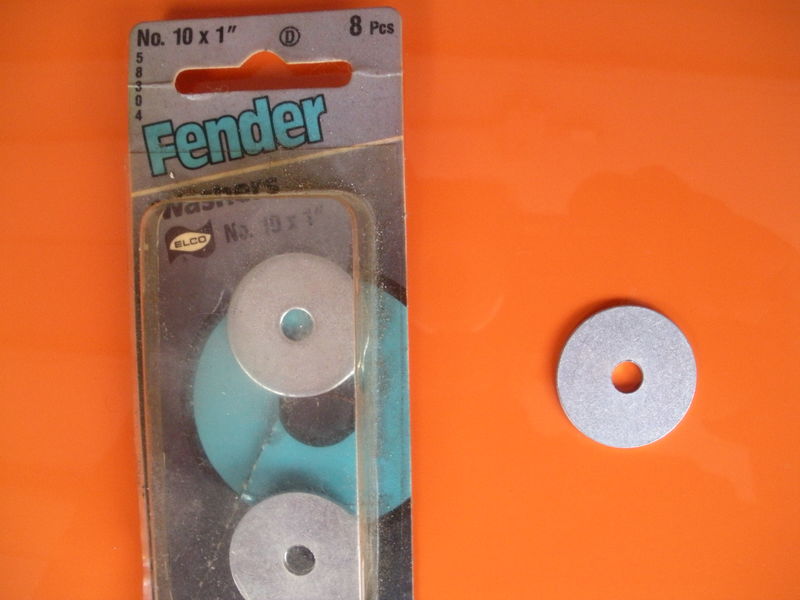
E. I removed the small washer on the torx screw and replaced it with a 1" washer (10x1" shown or 1/8" x 1"). This gave the chord something to slip over yet have enough room to stay in place when tension is relaxed (top down). Others have simply tightened the chord down with the torx screw. I prefer my method as it allows me to keep the torx screw completely tightened as it was meant to be. - don't want it coming loose and falling out.


Worked great after several days. I may go back and hand sew the chord to the strap for added strength.
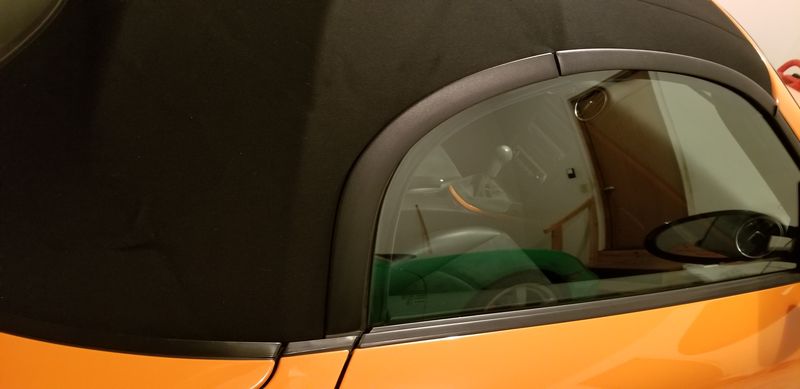


__________________
GPRPCA Chief Driving Instructor
2008 Boxster S Limited Edition #005
2008 Cayman S Sport - Signal Green
1989 928 S4 5 spd - black
1987 928 S4 - Granite Green Metallic (Felsengrun)

Last edited by husker boxster; 11-21-2021 at 09:35 AM.
husker boxster is offline   Reply With Quote
Old 07-03-2016, 07:01 PM   #2
Registered User
 
911monty's Avatar
 
Join Date: Oct 2014
Location: California Central Coast
Posts: 1,476
Garage
That's an absolutely brilliant fix! Better than OEM. Thanks for posting!
Now if you can come up with a way to get the annoying thread piece of that screw that's rolling from side to side inside the bow of my top that's been there since my top replacement...... :troll: Although it does let me know when I have achieved .8 G.
911monty is offline   Reply With Quote
Old 07-03-2016, 08:47 PM   #3
Multi-Boxer Driver
 
Deserion's Avatar
 
Join Date: Nov 2010
Location: Orange Park, FL
Posts: 1,404
Garage
Thanks, Husker! This issue is present on my mom's '06, and now I can resolve that when I fix a few other items on it.
__________________
-Chris
2004 Porsche Boxster 2.7
1991 Porsche 911 C2 Targa 3.6
2017 Subaru Outback 3.6R
Deserion is offline   Reply With Quote
Old 07-04-2016, 05:50 AM   #4
Registered User
 
Dr. Acula's Avatar
 
Join Date: Jun 2016
Location: Colorado
Posts: 65
Very nicely done, Husker. Thanks for providing detailed photos and instructions.

I'd like to propose an even easier solution.

You can buy these on Amazon:


This is easy, no tools, quick, and adjustable.
Plus, it's cheap (4 for $13!) . Use two and give a pair to a fellow Boxster owner.

Here's what you do - Leave the original elastic in place. Clip one end of the Bed Band to the old elastic as close as possible to where it is attached to the screw. Clip the other end about halfway up the fabric triangle that holds the elastic to the top. Then adjust to the proper length. I adjusted mine where the unused tail portion was about 3.5 inches long (7 inches doubled over and roughly the length of what I can hold in my fist).

Works like a charm.

If the elastic shock cords tire out in a few years, you can either adjust them tighter or replace them with the spare pair that came in the set.

:dance:
Dr. Acula is offline   Reply With Quote
Old 09-23-2019, 03:46 PM   #5
Registered User
 
Join Date: Sep 2019
Location: grass valley
Posts: 3
Tension straps boxster

thanks Dr Acula the strap tensioners from amazon worked perfectly ~ I had duct taped and clip with garage stuff and didnt work the cheap clips from amazon worked great! and easy to do Q thanks
marc
marccuniberti is offline   Reply With Quote
Old 09-23-2019, 03:47 PM   #6
Registered User
 
Join Date: Sep 2019
Location: grass valley
Posts: 3
the straps from amazon worked perfectly compared to these other methods who WOULD use anything else for about 9 bucks and 10 minute my jury rigged mess was solved with these amazon clips great post thanks
marccuniberti is offline   Reply With Quote
Old 09-25-2019, 08:59 AM   #7
Registered User
 
Join Date: Aug 2017
Location: Tucson,az
Posts: 690
Hello,..do you fit the black triangle plastic pieces back in,..mine fell out and caused a bent arm..?? Thanks Frank
flmont is offline   Reply With Quote
Old 09-25-2019, 04:07 PM   #8
Registered User
 
Finnegan's Avatar
 
Join Date: Jun 2014
Location: Oregon
Posts: 455
Quote:
Originally Posted by Dr. Acula View Post
Very nicely done, Husker. Thanks for providing detailed photos and instructions.

I'd like to propose an even easier solution.

You can buy these on Amazon:


This is easy, no tools, quick, and adjustable.
Plus, it's cheap (4 for $13!) . Use two and give a pair to a fellow Boxster owner.

Here's what you do - Leave the original elastic in place. Clip one end of the Bed Band to the old elastic as close as possible to where it is attached to the screw. Clip the other end about halfway up the fabric triangle that holds the elastic to the top. Then adjust to the proper length. I adjusted mine where the unused tail portion was about 3.5 inches long (7 inches doubled over and roughly the length of what I can hold in my fist).

Works like a charm.

If the elastic shock cords tire out in a few years, you can either adjust them tighter or replace them with the spare pair that came in the set.

:dance:
Ooooh! I'm gonna try this. Thank you!
__________________
'04 Midnight Blue Metallic 986
Finnegan is offline   Reply With Quote
Old 09-25-2019, 06:47 PM   #9
Registered User
 
husker boxster's Avatar
 
Join Date: Sep 2006
Location: Omaha
Posts: 2,865
Quote:
Originally Posted by flmont View Post
Hello,..do you fit the black triangle plastic pieces back in,..mine fell out and caused a bent arm..?? Thanks Frank
No issues with that using my method.
__________________
GPRPCA Chief Driving Instructor
2008 Boxster S Limited Edition #005
2008 Cayman S Sport - Signal Green
1989 928 S4 5 spd - black
1987 928 S4 - Granite Green Metallic (Felsengrun)
husker boxster is offline   Reply With Quote
Old 09-02-2021, 06:46 AM   #10
Registered User
 
Join Date: Apr 2021
Location: 24450
Posts: 12
Quote:
Originally Posted by husker boxster View Post
Disclaimer 1: Not sure if 986s have this issue, but it's prevalent with 987s.

The 986's have this problem. The issue I'm facing as I don't have the fabric piece that your elastic is attached too. The velcro strap on the convertible frame is all that remains of whatever used to provide the tension that guides the nylon beading into the aluminum channel. I'll have to figure something else out. I've watched other videos on YouTube and all of them have some fabric still attached to the nylon beading. Mine must have torn off at the seam--on both sides.

woodgeek is offline   Reply With Quote
Post Reply


Thread Tools
Display Modes

Posting Rules
You may not post new threads
You may not post replies
You may not post attachments
You may not edit your posts

BB code is On
Smilies are On
[IMG] code is On
HTML code is On
Trackbacks are On
Pingbacks are On
Refbacks are On


All times are GMT -8. The time now is 01:22 AM.


Powered by vBulletin® Version 3.8.7
Copyright ©2000 - 2024, vBulletin Solutions, Inc.
Content Relevant URLs by vBSEO 3.6.0
Copyright 2024 Pelican Parts, LLC - Posts may be archived for display on the Pelican Parts Website -    DMCA Registered Agent Contact Page