 02-06-2014, 06:16 PM
|
#21
|
|
Registered User
Join Date: Jun 2013
Location: Virginia
Posts: 353
|
That's awesome man, well done!
__________________
:ah:
|

|

|
 02-06-2014, 08:11 PM
|
#22
|
|
Custom User Title Here
Join Date: Mar 2012
Location: Ft. Leonard Wood
Posts: 6,169
|
Quote:
Originally Posted by Perfectlap

I would do a black glossy vinyl wrap on middle part of the center console. Or maybe 3M Di-Noc carbon wrap.
It will bring out the white more.
|
Great minds think alike 
I'd like to do either the cf or gloss black wrap at some point. It seems cheap and easy enough.
Progress may be slow because I have several pots on the fire right now, but I'll update with pics as I go 
__________________
https://youtube.com/@UnwindTimeVintageWatchMuseum
|

|

|
 02-06-2014, 08:22 PM
|
#23
|
|
Registered User
Join Date: Dec 2013
Location: tennesse
Posts: 73
|
LOVE IT~!!! good job! seriously... I love a good leather interior
__________________
2000 Boxster S
|

|

|
 02-07-2014, 12:53 AM
|
#24
|
|
Custom User Title Here
Join Date: Mar 2012
Location: Ft. Leonard Wood
Posts: 6,169
|
Thanks for the compliments and encouragement. 
I honestly wasn't sure if it looked ok or not. Sometimes you can get so wrapped up in a project that's it's difficult to step back for a new perspective.
Quote:
Originally Posted by Johnny Danger

PW,
Geppetto has nothing in you !
|
I sure hope not! He can tell Pinocchio to keep his nose to himself, too! 
__________________
https://youtube.com/@UnwindTimeVintageWatchMuseum
|

|

|
 02-07-2014, 03:13 AM
|
#25
|
|
Rennzenn
Join Date: Feb 2005
Location: Virginia
Posts: 1,369
|
Nice work. I did something similar with my console lid, armrests, and shifter boot. All of it came from a long leather jacket I thrift-store sourced for <$10. When I redid everything in carbon, it was a similar process.
|

|

|
 02-07-2014, 07:54 PM
|
#26
|
|
Registered User
Join Date: Nov 2013
Location: Colorado
Posts: 442
|
Quote:
Originally Posted by Porsche Chick

HOLY MOLY! 
That is seriously impressive, excellent work. As someone who has tangled with a sewing machine before, that's amazing.
Wow . . . :dance: |
I'm with Porsche Chick. I've done a lot of sewing too. Outstanding work! 
|

|

|
 02-07-2014, 08:27 PM
|
#27
|
|
Custom User Title Here
Join Date: Mar 2012
Location: Ft. Leonard Wood
Posts: 6,169
|
Thanks again 
I experimented with test pieces for a while before setting out to do this project, which helped a lot. I made this new e-brake piece in about 45 min this afternoon 
I still need to trim, skive and tuck in the end, but I think I like it 
Sorry for the bad pictures. I'll get some better shots in the daylight tomorrow.
Last edited by particlewave; 07-03-2017 at 05:13 PM.
|

|

|
 02-07-2014, 08:37 PM
|
#28
|
|
Custom User Title Here
Join Date: Mar 2012
Location: Ft. Leonard Wood
Posts: 6,169
|
I still need to smooth out the material and batting, but it's looking pretty good 
Last edited by particlewave; 07-03-2017 at 05:14 PM.
|

|

|
 02-09-2014, 07:43 AM
|
#29
|
|
Registered User
Join Date: Jun 2007
Location: Unionville, CT
Posts: 442
|
Darn good work. Never realized there was so much good leather available at a thrift store.
I had to replace my gray leather dashboard due to sun damage so I pulled the leather off the old downward facing sections and applied it to my armrest inserts. It finally was successful, but I thought I'd be buying new ones it was so darn difficult. Maybe the leather was to husky or inflexible. But it really looks good and is a bit softer than black plastic.
__________________
2001 Boxster, GT3 console delete, lower stress bar, RoW M030 suspension package, painted bumperettes.
|

|

|
 02-09-2014, 12:52 PM
|
#30
|
|
Custom User Title Here
Join Date: Mar 2012
Location: Ft. Leonard Wood
Posts: 6,169
|
Fin...
I'm so sick of leather.
__________________
https://youtube.com/@UnwindTimeVintageWatchMuseum
|

|

|
 02-10-2014, 12:18 AM
|
#31
|
|
Custom User Title Here
Join Date: Mar 2012
Location: Ft. Leonard Wood
Posts: 6,169
|
Got it installed this evening. I'll get some pictures in the light tomorrow. Until then, here's another before installation 
__________________
https://youtube.com/@UnwindTimeVintageWatchMuseum
|

|

|
 02-10-2014, 12:20 AM
|
#32
|
|
Registered User
Join Date: Jun 2013
Location: Virginia
Posts: 353
|
Seriously awesome
__________________
:ah:
|

|

|
 02-10-2014, 12:23 AM
|
#33
|
|
Registered User
Join Date: Sep 2013
Location: Montreal, QC. (currently expat to Shanghai)
Posts: 3,249
|
wooooo, missed this big time. Was in Beijing visiting friends for the last few holidays of Chinese New year
NICE NICE NICE work
Would you do custom job for others' Boxster interior if asked?
__________________
______________________________
'97 Boxster base model 2.5L, Guards Red/Tan leather, with a new but old Alpine am/fm radio.
|

|

|
 02-10-2014, 07:44 AM
|
#34
|
|
Registered User
Join Date: Jun 2012
Location: Bedford, TX
Posts: 2,755
|
Great result! That's going to look even better installed 
__________________
______________________________________________
2001 Boxster S Lapis Blue
TS Cat Bypass Pipes and exhaust
iPad Mini Dash Install
DEPO Tail Lights
|

|

|
 02-10-2014, 11:49 AM
|
#35
|
|
Custom User Title Here
Join Date: Mar 2012
Location: Ft. Leonard Wood
Posts: 6,169
|
Quote:
Originally Posted by RawleyD

Seriously awesome
|
Quote:
Originally Posted by Nine8Six

wooooo, missed this big time. Was in Beijing visiting friends for the last few holidays of Chinese New year
NICE NICE NICE work
|
Quote:
Originally Posted by BruceH

Great result! That's going to look even better installed  |
Thanks again guys 
Here are a couple of quick shots. Unfortunately, the seats hide a lot of the work. Though, as a driver or passenger, you can see most of it 
__________________
https://youtube.com/@UnwindTimeVintageWatchMuseum
|

|

|
 02-10-2014, 12:12 PM
|
#36
|
|
Registered User
Join Date: Jun 2012
Location: Bedford, TX
Posts: 2,755
|
I like it! Now it's time for you to start on some seat inserts 
__________________
______________________________________________
2001 Boxster S Lapis Blue
TS Cat Bypass Pipes and exhaust
iPad Mini Dash Install
DEPO Tail Lights
|

|

|
 02-10-2014, 12:39 PM
|
#37
|
|
Registered User
Join Date: Sep 2013
Location: Southern New Brunswick
Posts: 14
|
Quote:
Originally Posted by particlewave

Shifter and leather stretching/molding.
|
Nice work!
I think you may have just save me a lot of pain with an issue i have with a used replacement shifter i bought.
Can you elaborate on the leather molding/stretching and just how you got the white portion applied to the shifter?

I'm also curious as to how hard the silver portion of the shifter was to remove.
Cheers!
__________________
1999 Arctic Silver Boxster
|

|

|
 02-10-2014, 06:44 PM
|
#38
|
|
Custom User Title Here
Join Date: Mar 2012
Location: Ft. Leonard Wood
Posts: 6,169
|
Quote:
Originally Posted by Uncle Brad

Nice work!
I think you may have just save me a lot of pain with an issue i have with a used replacement shifter i bought.
Can you elaborate on the leather molding/stretching and just how you got the white portion applied to the shifter?
I'm also curious as to how hard the silver portion of the shifter was to remove.
Cheers!
|
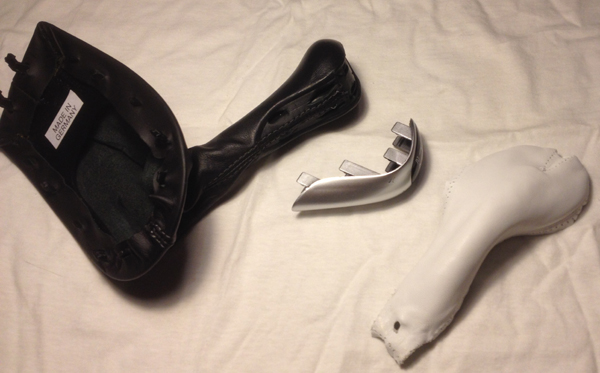
The silver piece is a bit snug at first, but it's just a press fit, so comes off easy enough. You want to pull it out on a 45 degree angle, not straight up or back.
To mold leather around curved pieces, I first get a dish sponge and run it under hot water, then ring it out and hold it against the raw side of the leather for about 1 minute. The heat and moisture softes the leather slightly. Then I just gently pull and stretch the leather with my thumbs to stretch it out where needed to achieve the proper curve. You can also pull and stretch it over the piece, though I find stretching it by hand is quicker and more effective.
Edit: a little more detail...
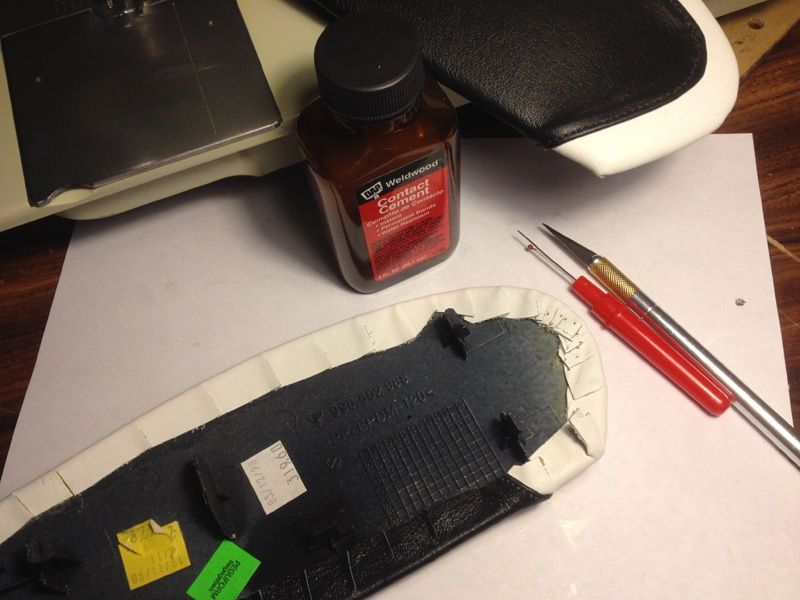
Once the piece of leather was stretched over the silver piece, I traced a line around the perimeter of the silver piece onto the back raw face of the leather to mark where the leather would wrap around the edge. I then used a Dremel with drum sander to thin or "skive" that perimeter line until the leather was only about half of it original thickness there. This makes it much easier to wrap around the edge of the silver insert. The leather was then trimmed to size (1 cm overlap) and the overlap was feathered and tacked to the backside with contact cement, similar to this:

__________________
https://youtube.com/@UnwindTimeVintageWatchMuseum
Last edited by particlewave; 02-10-2014 at 07:27 PM.
|

|

|
 02-11-2014, 12:19 PM
|
#39
|
|
Registered User
Join Date: Sep 2013
Location: Southern New Brunswick
Posts: 14
|
Great reply, i appreciate the detail. 
You're a talented lad!...and thanks for the metric measurement for this Canuck 
__________________
1999 Arctic Silver Boxster
Last edited by Uncle Brad; 02-11-2014 at 12:21 PM.
|

|

|
 02-11-2014, 06:58 PM
|
#40
|
|
Custom User Title Here
Join Date: Mar 2012
Location: Ft. Leonard Wood
Posts: 6,169
|
Quote:
Originally Posted by Uncle Brad

Great reply, i appreciate the detail. 
You're a talented lad!...and thanks for the metric measurement for this Canuck  |
No problem and thanks for the compliment 
I always use metric and only occasionally convert to imperial for the sake of others.
It was all pretty simple except for the e-brake, but the e-brake is also what got me started on this whole thing. The top plastic insert was cracked and looked horrible.
__________________
https://youtube.com/@UnwindTimeVintageWatchMuseum
|

|

|
 Posting Rules
|
You may not post new threads
You may not post replies
You may not post attachments
You may not edit your posts
HTML code is On
|
|
|
All times are GMT -8. The time now is 02:59 PM.
| |